The crispiest oven-baked chicken coated in a gooey sweet and sour sauce that fills the nostalgia of takeout vibes, but so much better!

Table of Contents
This recipe is…
It’s no secret that we love Asian-inspired flavors. We’ve dedicated a fair amount of time developing recipes that satisfy the nostalgic flavors of Chinese takeout from the comfort of your own home, and this sweet and sour chicken is no exception. We took the crispy chicken that was perfected in our Orange Chicken recipe, added some veggies to the sheet pan, and tossed it all in our sweet and sour sauce that makes for the most satisfying bite with tangy flavors that dance across your tastebuds.
For more Asian-inspired recipes, check out our honey sesame chicken, oven baked orange chicken, and Instant Pot bourbon chicken recipes!
What is Sweet and Sour Chicken?
The sauce for sweet and sour chicken is what delivers the iconic sweet, tangy flavor. This dish gets its sweetness from a little bit of brown sugar plus ketchup, and its tang from rice vinegar, pineapple juice, and a dash of soy sauce.
Sweet and Sour Baked Chicken Ingredients
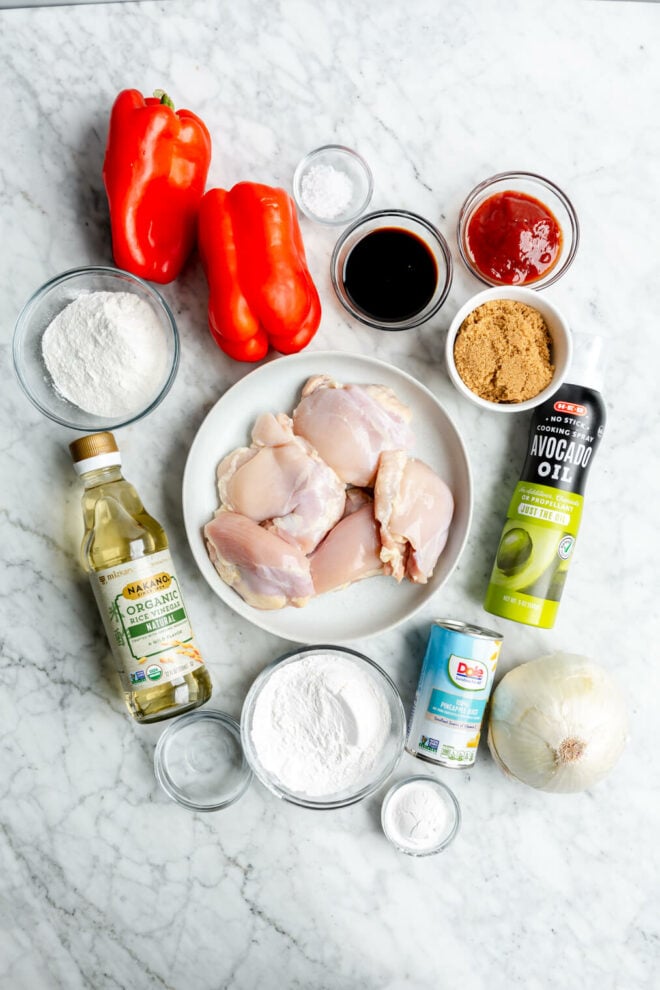
- 1 ½ pounds of chicken thighs
- 1 (6oz can) of pineapple juice
- ½ cup of brown sugar
- 1/4 cup of rice vinegar
- 1/4 cup of ketchup
- 3 tablespoons of soy sauce
- 2 tablespoons of water
- ½ cup + 1 tablespoon of arrowroot starch
- ½ cup of white rice flour
- 1 teaspoon of sea salt
- 2 red bell peppers
- 1 white onion
- Rice
- Avocado spray or 3 tablespoons avocado oil
Ingredient Modifications
- Make it gluten/dairy free. This recipe is made with arrowroot starch and rice flour, so is naturally gluten free and does not contain any dairy!
- Make it low-FODMAP. Substitute broccoli florets for the onions in the vegetables and use this ketchup.
- Change the vegetables. Feel free to substitute the bell peppers and onions for any other vegetable of your liking! Something that will roast in the 20-30 minute cooking window is best.
- Use a different protein. Use pork tenderloin for a fun spin on this classic combo. It’s just as tasty!
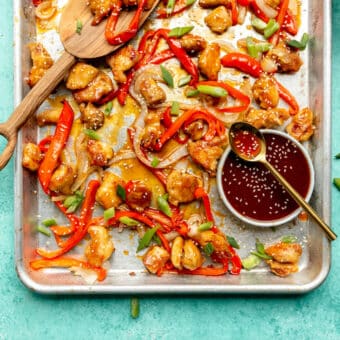
How to Make Sweet and Sour Chicken Baked on a Sheet Pan


- Prep. Preheat the oven to 425°F. Line a rimmed baking sheet with parchment paper, then lightly spray it with avocado oil spray (or brush with 1 tablespoon of avocado oil).
- Make the coating. In a small bowl, whisk together the arrowroot starch, white rice flour, and sea salt.
- Prep the chicken. Cut the chicken thighs into 1” cubes, then dredge in the flour mixture. Shake off any excess flour, and place the chicken pieces on one side of the baking sheet.
- Prep the veggies. Slice the bell pepper and onions and spread them out on the other side of the baking sheet. Lightly spray the chicken and veggies with avocado oil spray (or brush with the remaining 2 tablespoons of avocado oil).
- Bake. Bake for 20 minutes, then flip the chicken and pull the pan of veggies out of the oven. Bake the chicken for an additional 10 minutes until it’s browned and crisp.
- Make the sauce. While the chicken and veggies are cooking, whisk together the pineapple juice, brown sugar, rice vinegar, ketchup, and soy sauce in a saucepan over medium heat. Bring to a boil. Whisk together 1 tablespoon arrowroot starch with 2 tablespoons of water in a small bowl, then add the mixture to the sauce and whisk to combine. Reduce the heat to low and remove the sauce from the heat once thickened.
- Toss to combine. Toss the chicken with the sweet and sour sauce, then garnish with white sesame seeds. Serve over white rice and enjoy!
Frequently Asked Questions
We found that flour is too dense to produce the crispy texture we know and love for this sweet and sour chicken. The combination of arrowroot and rice flour makes for the best light and crispy coating.
While similar, sweet and sour chicken and orange chicken are different. The main difference is how the sauces are sweetened. Orange chicken uses orange juice and coconut sugar, while the sweet and sour sauce uses a combination of pineapple juice, brown sugar, and ketchup to provide the sweetness.
To store your baked sweet and sour chicken, allow your food to cool completely, then store in a covered container in the fridge for 3-5 days. To reheat, pop in the microwave for 1-2 minutes or saute in a pan on the stove over medium heat until the contents are heated through.
While this recipe is best straight out of the oven (it’s when the chicken is the crispiest), it will store just fine too! If you are making ahead, we recommend storing the chicken separate from the sauce so that it doesn’t get too soggy in the fridge. You can re-crisp the chicken in the oven at 350℉ until it is heated throughout, then toss with the sauce and enjoy!
More Favorite Chicken Recipes


Oven Baked Sweet and Sour Chicken
Ingredients
- 1½ pounds chicken thighs boneless, skinless
- 6 ounces pineapple juice
- ½ cup brown sugar
- ¼ cup rice vinegar
- ¼ cup ketchup
- 3 tablespoons soy sauce
- 2 tablespoons water
- ½ cup arrowroot starch + 1 tablespoon
- ½ cup white rice flour
- 1 teaspoon sea salt
- 2 bell peppers red
- 1 onion white
- rice for serving
- 3 tablespoons avocado spray or avocado oil
Instructions
- Preheat the oven to 425℉. Line a rimmed baking sheet with parchment paper, then lightly spray it with avocado oil spray (or brush with 1 tablespoon of avocado oil).
- In a small bowl, whisk together the arrowroot starch, white rice flour, and sea salt.
- Cut the chicken thighs into 1” cubes, then dredge in the flour mixture. Shake off any excess flour, and place the chicken pieces on one side of the baking sheet.
- Slice the bell pepper and onions and spread them out on the other side of the baking sheet. Lightly spray the chicken and veggies with avocado oil spray (or brush with the remaining 2 tablespoons of avocado oil).
- Bake for 20 minutes, then flip the chicken and pull the pan of veggies out of the oven. Bake the chicken for an additional 10 minutes until it's browned and crisp.
- While the chicken and veggies are cooking, whisk together the pineapple juice, brown sugar, rice vinegar, ketchup, and soy sauce in a saucepan over medium heat. Bring to a boil. Whisk together 1 tablespoon arrowroot starch with 2 tablespoons of water in a small bowl, then add the mixture to the sauce and whisk to combine. Reduce the heat to low and remove the sauce from the heat once thickened.
- Toss the chicken with the sweet and sour sauce, then garnish with white sesame seeds. Serve over white rice and enjoy!
Recipe Notes
- Make it gluten. Use gluten free soy sauce or tamarind to make this recipe gluten free.
- Make it low-FODMAP. Substitute broccoli florets for the onions in the vegetables.
- Change the vegetables. Feel free to substitute the bell peppers and onions for any other vegetable of your liking! Something that will roast in the 20-30 minute cooking time is best.
- Use a different protein. Use pork tenderloin for a fun spin on this classic combo. It’s just as tasty!


Wow! I made this the other night and we couldn’t get enough. Great as leftovers as well (though only ~1/2 a serving survived that long). Best recipe we’ve made in awhile.
We’re so glad you loved this recipe, Anna-Ruth! Thank you so much for sharing this with us!
Could using all cornstarch work with this recipe since you suggested substituting it for the rice flour?
We haven’t tried it, Melanie, so I can’t say for sure, but I think it would work just fine. Do know that cornstarch may result in a less crispy chicken than white rice flour, but it should act almost the same as arrowroot.
Hello! I’d like to make this recipe this week but am having a hard time finding white rice flour– it’s not at my HEB. Could you please share the brand or where to get it — or if another type of flour would suffice? Thank you!
Hi Karen, cornstarch would make for a great sub here. It will crisp up similarly to the white rice flour, since you’re not able to find it, and is hopefully more easily available! -Team FF
Love this! And my husband was shocked!
I’ve made the General Tao’s and orange chicken and we agree this one is the best! Although they are all excellent! I did sub orange juice for the pineapple because that’s all I had on hand, but it still turned out great! We seriously can’t get enough of y’all’s recipes or recommendations! They are the best!
Wahooo! That’s awesome, Christine! Thank you so much for sharing this with us.
Hello
Is the nutrition info listed for the sweet-and-sour baked chicken just for the chicken or the chicken and rice? And I assume the totals are the total recipe so divide by how many servings I break it into ?
Thanks !!!!!!
Absolutely love your weekly meals!
Hi Treca, great question! The nutrition information is just for the chicken, veggies, and sauce and divided by serving size. The rice is an additional component and not included. We are so glad you are enjoying our weekly meal plan! We love to hear that. -Team FF
This was sooooo soooo delicious! So quick and easy and just such great flavor. Crunchy, an ample amount of sauce….just wonderful!! A couple notes in case others are making this. 1- mine did NOT fit on a single baking sheet (and I used a VERY large one). Like, not even close, haha. And I only had 1 lb of chicken. Not a big deal whatsoever, I’ll just know to prepare a second sheet next time. 2- the store by me only had brown rice flour. I was worried it wouldn’t work because often recipes calling for white rice and brown rice need different cooking times, but when ground to flour, there was no issue! Maybe it’ll taste even better once I can get my hands on white rice flour, but like I said earlier, it was so stinking yummy I can’t even imagine it made much difference.
The only other thing I’ll mention is this recipe was written a bit differently than I’m used to seeing F+F recipes….it’s not in order of when you use the ingredients if that makes sense. Not an issue, just kind of takes a bit more effort when going back and forth between directions and ingredients.
Go make this right away!!!! You will not be disappointed!
Thank you for your generous feedback, Allison! We are glad to hear that you enjoyed and have taken notes for updating the article. We appreciate you! -Team FF
Loved this recipe!! Can confirm that air frying the chicken tastes just as good!
I am interested in seeing how the sauce freezes as the recipe makes more than I needed for the meal.
We’re so glad you enjoyed AND to hear it worked out well in the air fryer! The sauce should freeze well. We recommend freezing in an ice cube tray if you have one so you can pop it out in the servings you need. -Team FF
Hi, this is not Low Fodmap. The Monash institute has lowered the red bell peper ratio to 43 grams per meal, and ketchup is not Low Fodmap. I really do like this site and your recipes, but there are many mistakes with the Fodmap adjustments.