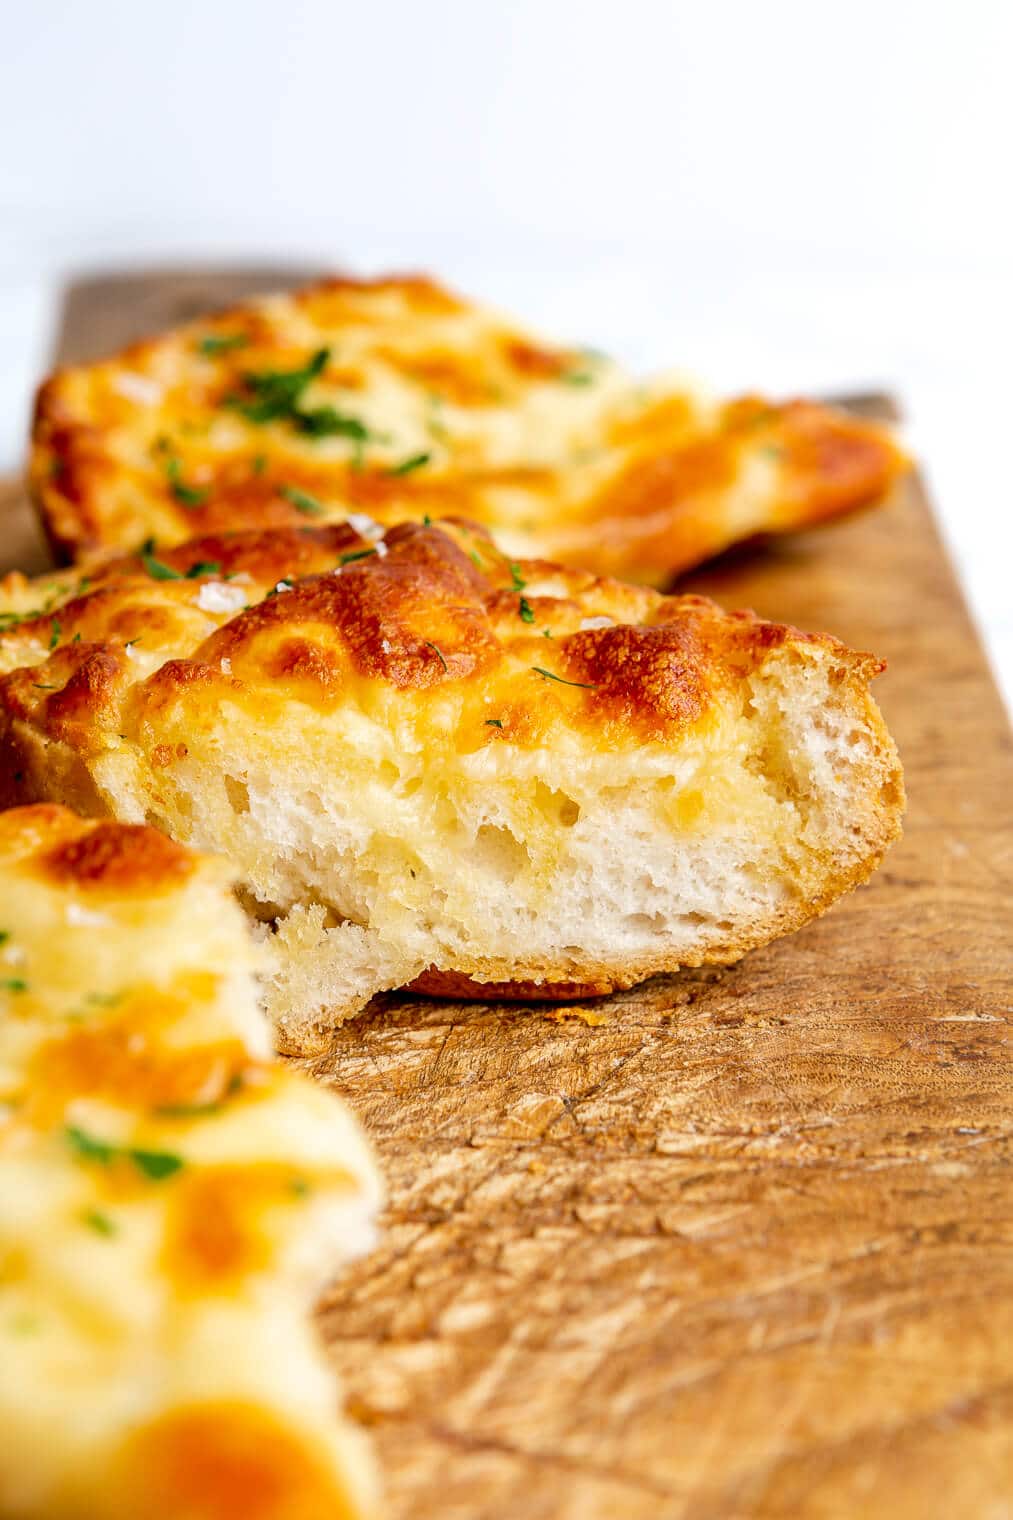
Get ready for a cheesy garlic bread experience that’s out of this world! Think: garlic butter goodness covered by melted, gooey cheese, all on a freshly baked baguette. It’s comfort food with a flavorful twist and perfect as an appetizer or side next to your favorite pasta (may I suggest this easy chicken marinara) and Italian side salad duo!

Table of Contents
This recipe is…
Does it get any better than homemade, ooey-gooey, cheesy garlic bread? I don’t think so! This homemade version is 100x better than any store-bought garlic bread that I’ve tried and so, so easy to make. Softened butter gets mixed with roasted garlic & salt, slathered over baguette halves, then the whole thing gets topped with lots and lots of cheese and baked to bubbly perfection. Let’s jump in!
Recipe Ingredients
This garlic bread calls for 7 really simple ingredients. Here’s everything you’ll need:
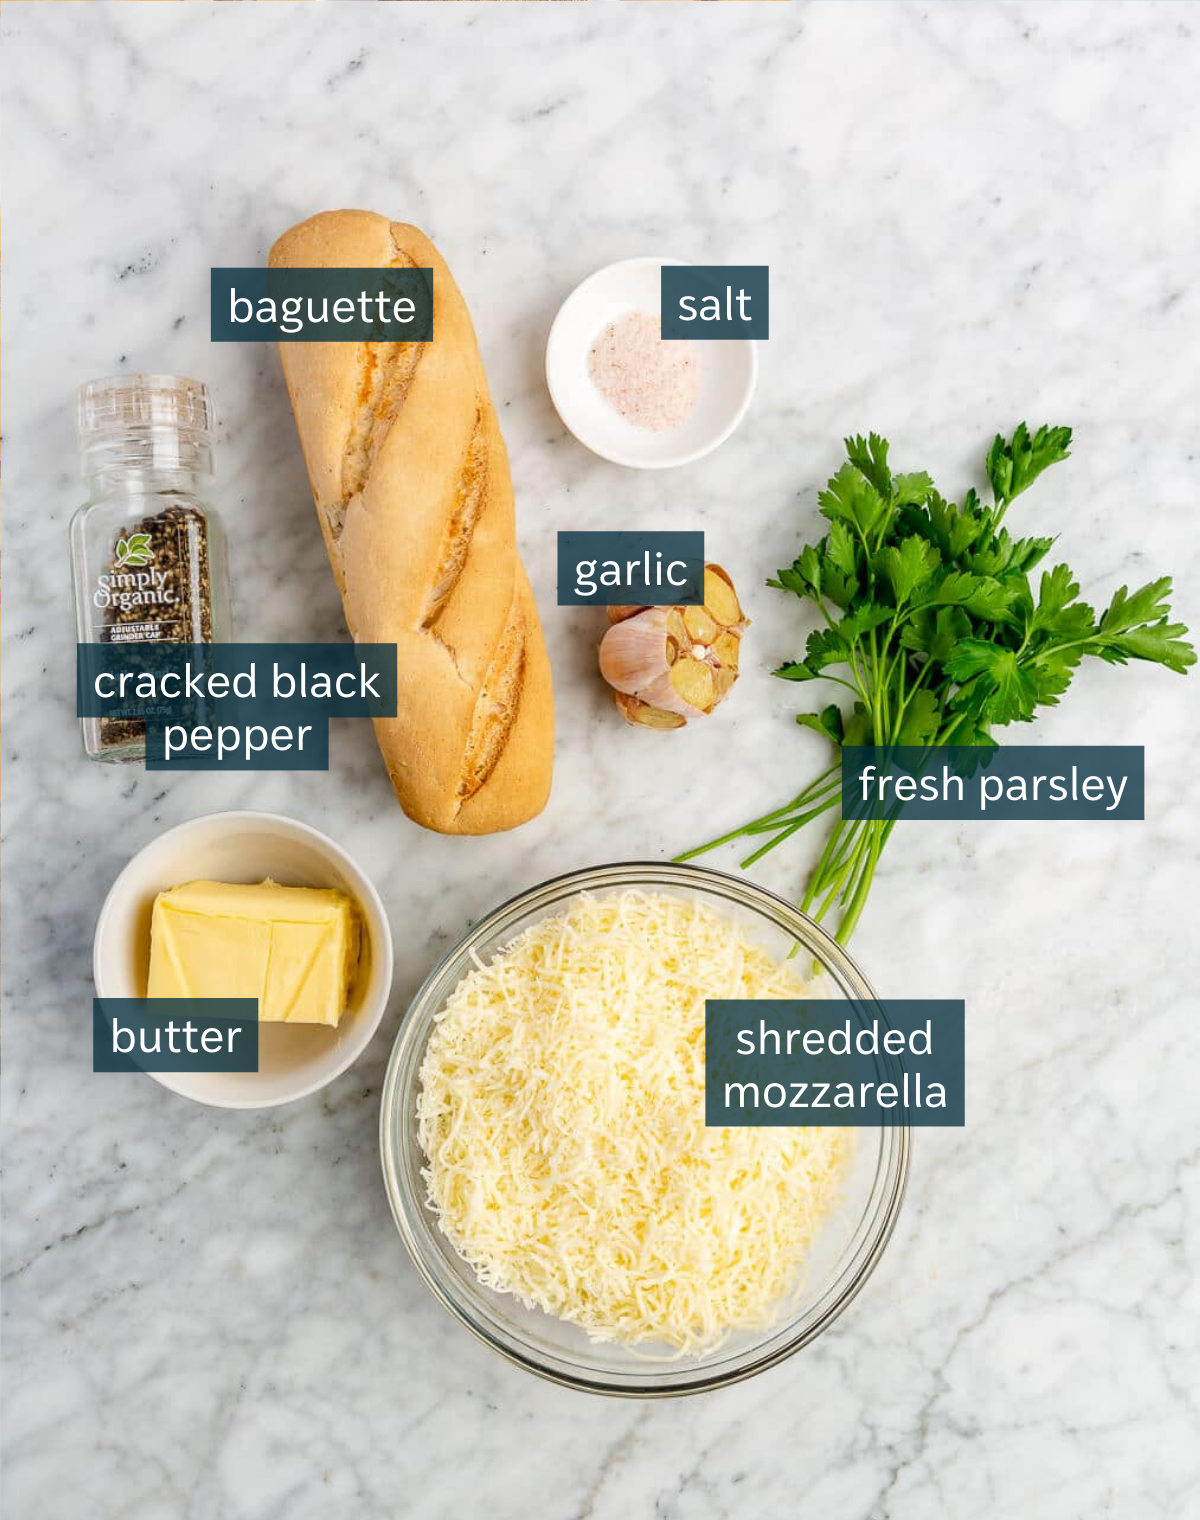
- Baguette – we used a gluten-free baguette, but any baguette will work.
- Butter
- Garlic
- Sea salt
- Shredded mozzarella
- Fresh parsley
- Cracked black pepper
How to Make Homemade Cheesy Garlic Bread
Below, you’ll find a set of instructions for roasting the garlic and then a set for making the garlic bread. Note that you can absolutely roast the garlic ahead of time so that your garlic bread is much quicker to whip up!


To Roast the Garlic
- Prep – preheat the oven to 375°F and peel the outer layers of the garlic skin off, leaving the cloves still attached. Cut the top of the bulb off, making sure to also cut the tops of the cloves hiding on the side.
- Wrap in foil – wrap the prepped garlic bulb in parchment paper with the cut side up.
- Roast – bake the wrapped garlic at 375°F (balance in a muffin pan if needed) for 30-45 minutes.
- Let cool – remove the garlic from the oven and let cool before handling.
To Make the Bread
- Preheat the oven to 400°F.
- Make the butter mixture – mix the softened butter, garlic, and salt together in a bowl.
- Add the garlic butter to the baguette – spread the garlic butter evenly on the cut side of the two bread halves.
- Add cheese – add the cheese on top of the garlic butter.
- Bake – bake at 400°F for 10-15 minutes (until the cheese is browned and bubbly).
- Garnish and enjoy – garnish with cheesy bread with parsley and cracked pepper, and enjoy!
Recipe Tip
Make this cheesy garlic bread recipe SUPER easy by roasting the garlic up to a week in advance, so that all you have to do on the day of is mix, spread, bake, and enjoy.
How to Serve
Serve this decadent garlic bread with any meal you’d like to add a crusty bread to. Here are a few of our favorite garlic bread-worthy meals:
- Homemade Chicken Marinara
- No-Boil Pasta Bake
- GF Pasta Primavera
- Lobster Fettuccine Alfredo
- No-Boil Chicken Alfredo Bake
- Sausage and Roasted Tomato Pasta
How to Store and Reheat
Cheesy garlic bread is definitely best enjoyed right out of the oven, but if you have leftovers, store them in an airtight container or bag in the refrigerator for up to 5 days. To reheat, place the slices in the oven or air fryer until heated through.
If you want to store leftovers in the freezer, that works great too! To freeze individual slices, wrap each piece in parchment paper and then place in a freezer-safe bag. When you’re ready to enjoy a piece, simply place it on a sheet pan in a 375°F oven until warmed through!
Frequently Asked Questions
If you don’t want to heat up your house (or if your oven is out of commission), feel free to “bake” your bread in a toaster oven instead. If you have an air fryer, that’ll work too. You’ll just need to cut your bread into smaller pieces (vs. baking the long baguette halves) so that they fit in the basket. Air fry your bread (topped with the butter mixture only) at 375°F for 5 minutes, then add the cheese, and continue to air fry for 3 minutes.
Everything made in the Fed & Fit office is gluten-free, so we chose My Bread GF baguettes (we found ours at Sprouts). If you’re not gluten-free, feel to grab any baguette you love.
You can absolutely prepare your bread and then bake it later! Simply slather the softened garlic butter onto the bread, add the cheese, and then refrigerate until you’re ready to enjoy. If you want to make it WAY in advance, do the steps above, but place the bread (still on a sheet pan) in the freezer, let it freeze completely, and then (only once frozen) place the two halves together and wrap them in parchment paper and then foil. When you’re ready to enjoy, let the bread thaw enough to separate the two halves, then place in a 400°F oven until heated through.
More Favorite Recipes


Cheesy Garlic Bread (Easy & Homemade!)

Ingredients
- 1 baguette, sliced in half
- ⅓ cup butter, softened
- 1 bulb garlic
- 1 teaspoon sea salt
- 1 cup shredded mozzarella
- 2 tablespoons fresh parsley, finely chopped, for garnish
- Cracked black pepper, for garnish
Instructions
To Roast the Garlic
- Preheat the oven to 375°F and peel the outer layers of the garlic skin off, leaving the cloves still attached. Cut the top of the bulb off, making sure to also cut the tops of the cloves hiding on the side.
- Wrap the prepped garlic bulb in parchment paper with the cut side up.
- Bake the wrapped garlic at 375°F (balance in a muffin pan if needed) for 30-45 minutes.
- Remove the garlic from the oven and let cool before handling.
To Make the Bread
- Preheat the oven to 400°F.
- Mix the softened butter, garlic, and salt together in a bowl.
- Spread the garlic butter evenly on the cut side of the two bread halves.
- Add the cheese on top of the garlic butter.
- Bake at 400°F for 10-15 minutes (until the cheese is browned and bubbly).
- Garnish with cheesy bread with parsley and cracked pepper, and enjoy!


This was seriously amazing for the effort put into it. Will be sharing and making again!
Wahooo! Great to hear!