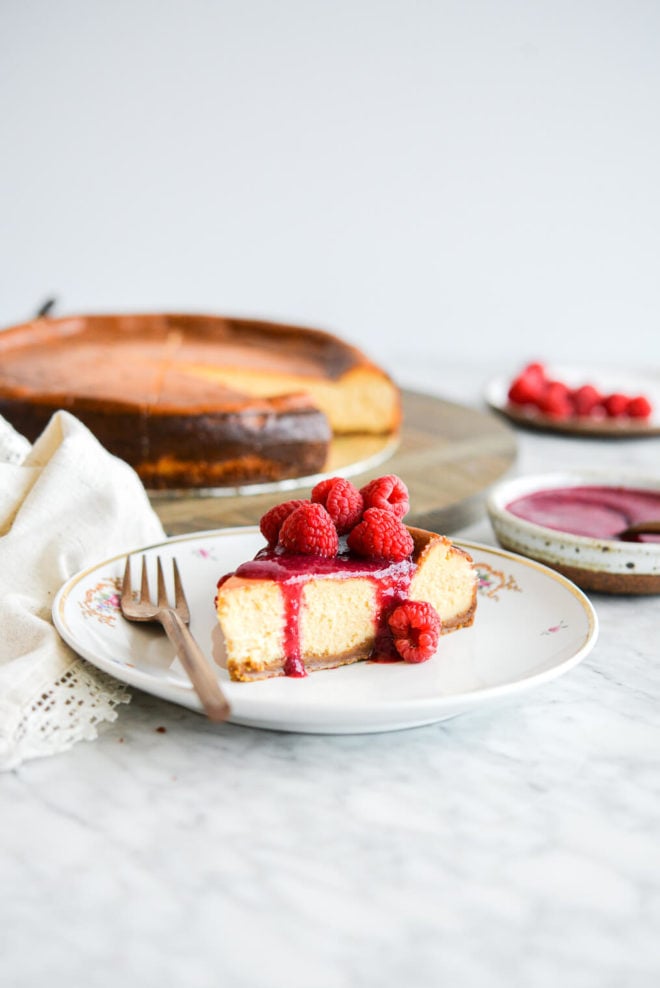
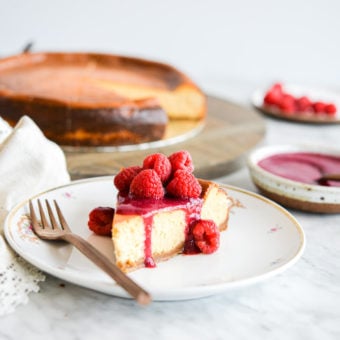
This incredibly rich, custard-meets-cheesecake recipe is sure to be a showstopper dessert at your next gathering!
Best Recipe for Cheesecake
The baking majesty herself, Brittany Angell, has opened up her family vault and is sharing (for the first time ever!) her secret family recipe for the most delicious classic cheesecake in a gluten free version! This recipe has a higher quantity of egg yolks than other traditional recipes, which gives it an almost custard-like cheesecake texture, and let me tell you–it is decadent, rich, and DELICIOUS! In Brittany’s experience, the common reaction when people eat this cheesecake is, “this is the best cheesecake I have ever had – how did you make it?”
Is it easy to make cheesecake?
I can tell you in the past, I have always defaulted to a no-bake cheesecake because baking a cheesecake felt intimidating to me (spring form pans, water baths, and chilling, oh my!). But after making this recipe (in addition to the keto and vegan version), I can say with confidence that it is actually approachable and EASY to make cheesecake! Don’t get me wrong, I love a no-bake cheesecake, but there is a certain richness you only achieve through the addition of the egg yolks in this recipe that make tackling the process (and the time) totally worth it!
Cheesecake Ingredients
The ingredients are fairly simple, but don’t be fooled, there is nothing simple about the flavor! Here’s what you’ll need.
For the crust:
- Graham Cracker – to make the crust, you’ll need 1 ½ cups of graham cracker crumbs (I like these graham crackers for gluten free).
- Cane Sugar – 2 tablespoons of organic cane sugar gives the crust just the right amount of sweetness.
- Butter – 5 tablespoons of melted, salted butter hold the graham crackers and cane sugar together to finish out the crust.
For the filling:
- Cream Cheese – to start, you’ll use 2 pounds of cream cheese (the equivalent of 4- 8 ounce blocks).
- Cane Sugar – 1 ⅓ cup of organic cane sugar gives this dessert its sweet flavor.
- Flour – 3 tablespoons of flour helps to give the filling structure (if you’re gluten free, feel free to use King Arthur Gluten Free Measure for Measure).
- Vanilla Extract – 1 tablespoon of vanilla extract gives a subtle, warm note of flavor.
- Eggs – 4 large eggs are the perfect amount of egg for a smooth texture.
- Egg Yolk – 2 large egg yolks, in addition to the whole eggs, are the secret to the creamy, custard-like texture of the filling.
- Heavy Cream – a ¼ cup of heavy cream adds a nice richness to the finished product.
- Lemon Zest – ½ to 1 teaspoon of lemon zest and…
- Orange Zest – ½ to 1 teaspoon of orange zest adds a fresh and bright citrus note.
- Salt – a ½ teaspoon of salt enhances the complexity and brings all of the flavors together.
To prevent sticking:
- Cooking Spray – coats the interior of the pan for an easy release after baking and cooling.
Ingredient Modifications
This recipe is seriously perfect as written, and I wouldn’t recommend changing it too much because baking is a science and even the smallest changes can really impact the overall finished product. Here are some tried and successful modifications:
- Make it gluten free – use gluten free graham crackers for the crust and King Arthur Gluten Free Measure for Measure Flour in place of the all-purpose flour.
- Make it dairy-free – swap the cream cheese for Tofutti vegan cream, cheese and the heavy cream for Silks Dairy Free Whipping Cream for the filling. Use vegan butter (I like Miyokos) and a dairy free graham cracker for the crust.
Supplies Needed to Make this Recipe
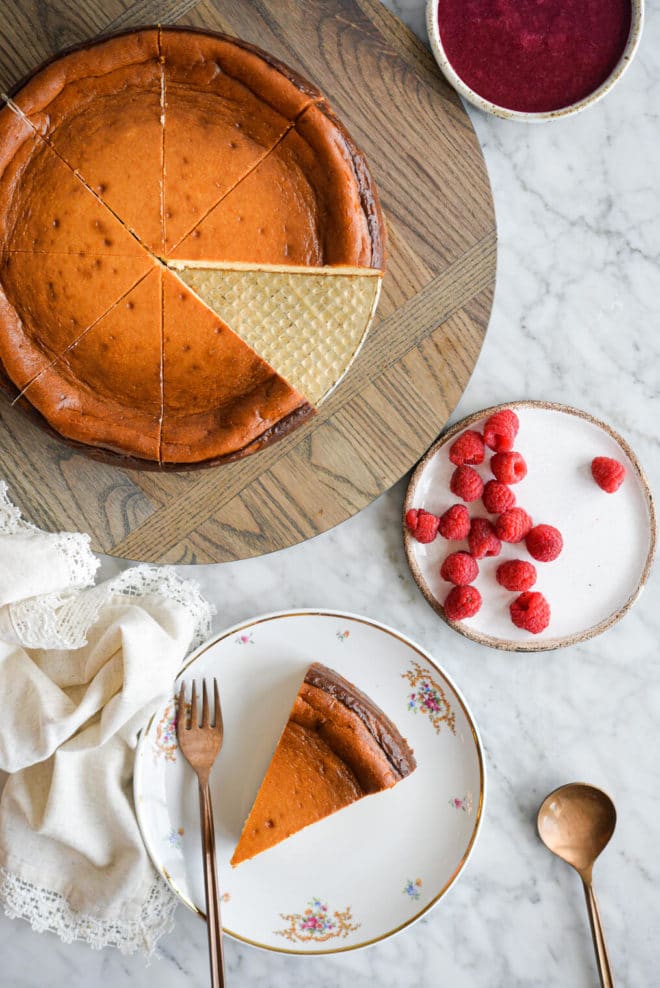
How to make Cheesecake
Don’t be intimidated by the process! It can be technical, but if you follow Brittany’s instructions, you’ll be well on your way to a beautiful dessert! Here’s how you’ll do it:


- Preheat and prep – first, you want to get everything ready to bake! Preheat the oven to 475℉. Trace the inside base of a 9” springform pan on parchment and cut it out. Place the parchment cutout inside of the pan and wrap the bottom of the pan with several layers of aluminum foil (this helps to prevent spillage from the pan). To prevent sticking and make for an easy release once the cheesecake is finished baking and cooling, spray the entire interior of the pan with oil (a neutral oil like avocado oil is great here).
- Make the crust – add your graham crackers and sugar into your food processor and pulse until you have a fine crumb. Then pour in your melted butter and stir the mixture by hand until the butter is incorporated throughout. Pour the mixture into the bottom of the springform pan and press it down evenly across the bottom of the pan and set aside.
- Make the filling – rinse out the food processor and wipe it dry. Add to it the cream cheese, sugar, flour, and vanilla and process until fully mixed and smooth (this part is so satisfying to watch come together).
- Add the remaining ingredients – to the cream cheese mixture, add the remaining ingredients (eggs, egg yolks, heavy cream, lemon zest, orange zest, and salt) and puree for an additional 40-60 seconds (be careful not to overmix at this point, as overmixing can incorporate too many air bubbles into your filling that may cause the cake to crack and fall when baking).
- Pour into the pan – pour the filling on top of your graham cracker crust in the pan.
- Bake – Place your cheesecake in the oven on the center rack and set the timer for 20 minutes. Resist any urge to open your oven to take a peek during the baking process because it allows heat and moisture to escape (which ultimately will impact the overall bake).
- Turn the oven down – after 20 minutes, turn the oven heat down to 200℉ and bake for an additional 60 minutes.
- Cool in the oven – after the 60 minutes of additional bake time is up, turn the oven off and crack the oven door (while leaving your cheesecake inside) and allow your cheesecake to cool to fully set and cool for one hour.
- Continue cooling – after the initial cool in the oven, remove the cheesecake from the oven and allow it to continue to cool at room temperature for an additional 1-2 hours before wrapping it up. Don’t skip these cooling steps (even though they may seem tedious)! This slow cooling process is the key to keeping the cake from cracking.
- Final set – wrap your cheesecake in aluminum foil and place it in the fridge for 16-24 hours before serving to allow the cake to fully set.
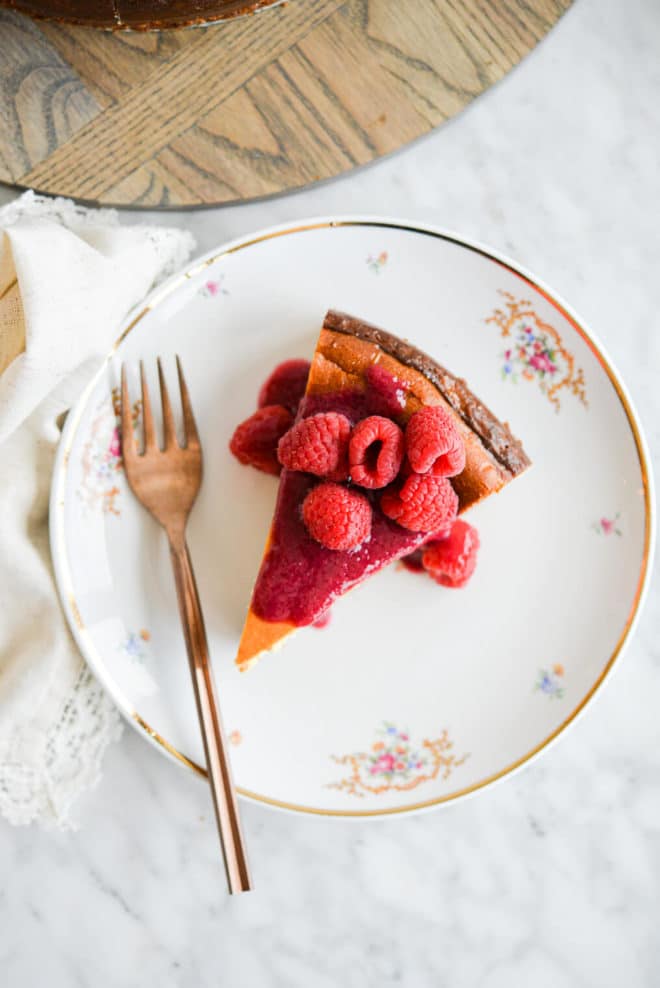
- Serve and enjoy! – I promise it will be worth the wait!
What happens if you over-mix cheesecake?
With most cakes, you want to beat air into the batter to produce an airy, fluffy cake. BUT, this is not the case for cheesecakes! Adding too much air into the batter causes the cheesecake to rise and fall when baking, which leaves cracks on the surface. Starting with all of your ingredients at room temperature is a helpful way to avoid overmixing since your ingredients will be easier to incorporate into one another.
Do you need to bake cheesecake?
Since this classic cheesecake recipe includes raw eggs, you do have to bake it.

Do you need a water bath for the best cheesecake?
As a cheesecake (and overall baking) novice, I asked Brittany to provide her expert level input on this one. Here’s the skinny on water baths. The reason you would use a water bath when making a cheesecake is to prevent cracking and keep the top from becoming rubbery. Brittany found that by slowly cooling down the cheesecake in the oven (even without the water bath) made all the difference in preventing cracks. Handling the cheesecake before it sets up or putting it too quickly through temperature changes is the culprit for causing cracks. As long as the process is followed exactly how Brittany developed it, to allow for the cheesecake to fully set up before you handle it, you should be good!
As far as the rubbery top issue, Brittany said that with a water bath, the top is marginally better. However, she found that once she covered the cheesecake and let it chill in the fridge overnight, the top layer softened significantly as a result of some of the condensation that built up and still had a lovely texture! In her professional and experienced opinion, she thinks a water bath is completely optional! You can certainly still use one if you want to make your cheesecake the classic way, but can definitely be an optional step!
How to tell if Cheesecake is done
For this recipe, your cheesecake should be smooth, browned, and slightly puffy on the edges when it’s done. There are a few different ways you can check further:
- Give it a jiggle – give the pan a gentle shake to see how much jiggle is in the filling. You don’t want to see much movement here. If the center is very jiggly or soupy, the cheesecake needs more time.
- Internal temperature – you want the internal temperature of your cake to be 150℉. You can check the center of the cake by using an internal thermometer.
- Tap the top – your cheesecake should be firm to the touch and not leave any batter residue on your finger.
If you follow the baking instructions provided by Brittany, your cheesecake should be perfectly baked! The biggest mistake people make when baking is opening the oven to check on their baked goods–this lets out heat and moisture which impacts the bake. So once you’ve placed your cheesecake in the oven, let it ride until the end!
Cheesecake FAQs
According to Brittany, cracks in your cheesecake are caused by moving your cheesecake too quickly through temperature change. It’s why she developed this recipe using a slow and gradual cooling process.
Follow Brittany’s instructions to a tee, and your cheesecake should stay smooth and crack-free!
This classic cheesecake recipe is intended to have a golden-brown top. The browning is a result of the sugars in the filling caramelizing–delicious!
Over-mixing and incorporating too much air into the cheesecake filling can cause the cheesecake to fall apart.
Storing and Freezing Cheesecake
Since cheesecake is a heavily dairy-based cake, it shouldn’t sit out for longer than 2 hours unrefrigerated.
For this recipe, the cheesecake cools for an hour in the oven (with the door cracked) and an additional 1-2 hours on the counter before heading into the fridge for its final set.
This cheesecake is intended to be prepared about 24 hours in advance of when you want to serve, but can last up to 3 days in the fridge as long as it is covered tightly to prevent the cold refrigerator air from drying out the top of the cake.
You bet! As long as you wrap the cheesecake extremely well to prevent freezer burn, it is good frozen for up to one month. You can freeze it whole or in slices. To thaw, allow it to sit in the fridge for 2 days to thaw out slowly.
More Dessert Cake Recipes
Homemade Cheesecake
Ingredients
For the crust:
- 1 ½ cups graham crackers crumbs
- 2 tablespoons organic cane sugar
- 5 tablespoons butter melted
For the filling:
- 2 pounds cream cheese 4- 8 ounce blocks, room temperature
- 1 ⅓ cup organic cane sugar
- 3 tablespoons flour
- 1 tablespoon vanilla extract
- 4 large eggs room temperature
- 2 large egg yolks room temperature
- ¼ cup heavy cream
- ½-1 teaspoon lemon zest
- ½-1 teaspoon orange zest
- ½ teaspoon salt
To prevent sticking:
Instructions
- Preheat the oven to 475℉. Trace the inside base of a 9” springform pan on parchment paper and cut it out. Place the parchment cutout inside of the pan and wrap the bottom of the pan with several layers of aluminum foil (this helps to prevent spillage from the pan). To prevent sticking spray the entire interior of the pan with oil (a neutral oil like avocado oil is great here).
- Add your graham crackers and sugar into your food processor and pulse until you have a fine crumb. Then pour in your melted butter and stir the mixture by hand until the butter is incorporated throughout. Pour the mixture into the bottom of the springform pan and press it down evenly across the bottom of the pan and set aside.
- Rinse out the food processor and wipe it dry. Add the cream cheese, sugar, flour, and vanilla and process until fully mixed and smooth.
- To the cream cheese mixture, add the remaining ingredients (eggs, egg yolks, heavy cream, lemon zest, orange zest, and salt) and puree for an additional 40-60 seconds (be careful not to overmix at this point, as overmixing can incorporate too many air bubbles into your filling that may cause the cake to crack and fall when baking).
- Pour the filling on top of your graham cracker crust in the pan.
- Place your cheesecake in the oven on the center rack and set a timer for 20 minutes. Resist any urge to open your oven to take a peek during the baking process because it allows heat and moisture to escape (which ultimately will impact the overall bake).
- After 20 minutes, turn the oven heat down to 200℉ and bake for an additional 60 minutes.
- After the 60 minutes of additional bake time is up, turn the oven off and crack the oven door (while leaving your cheesecake inside) and allow your cheesecake to cool to fully set and cool for one hour.
- Remove the cheesecake from the oven and allow it to continue to cool at room temperature for an additional 1-2 hours before wrapping it up. Don’t skip these cooling steps (even though they may seem tedious)! This slow cooling process is the key to keeping the cake from cracking.
- Wrap your cheesecake in aluminum foil and place it in the fridge for 16-24 hours before serving to allow the cake to fully set.
- Serve and enjoy!


Thanks for the update and for
Please let me know what is this? I heard something else in the video before is something wrong?
It’s classic cheesecake! -Team FF
I love to join it