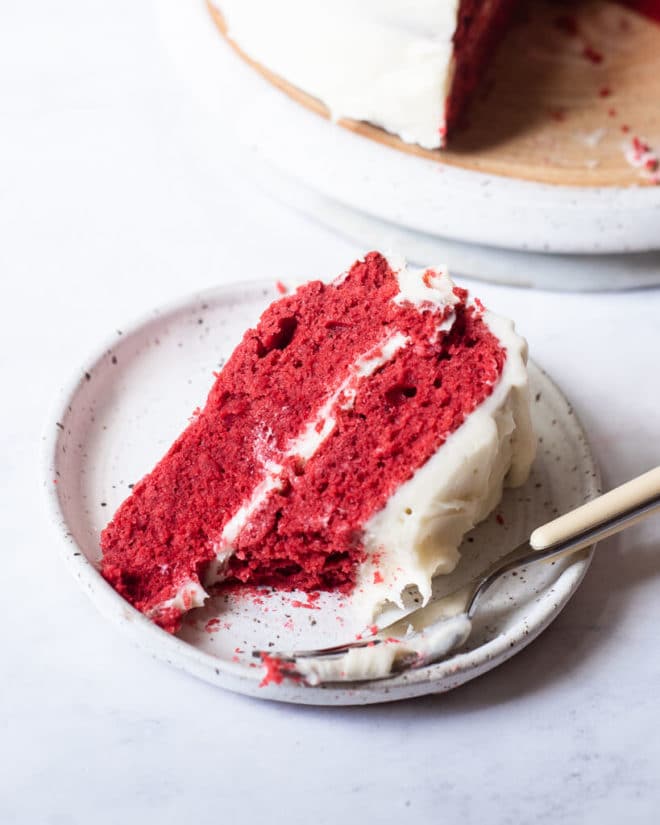
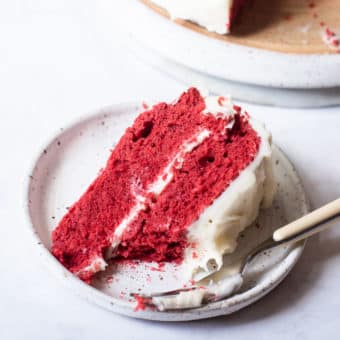
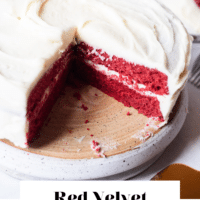
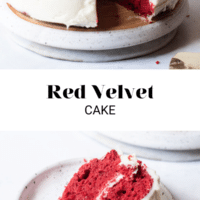
With the classic red color and a subtle hint of chocolate, this red velvet cake is easy to make and really, really delicious!
Homemade Red Velvet Cake Recipe
If you’re looking for a REALLY delicious red velvet cake recipe, look no further! Created by the baking queen herself, (Brittany Angell), this one is incredibly easy to make and so, so yummy. It’s sure to impress any guests you may be serving it to!
What makes red velvet cake different?
Besides the fact that the cake itself is red in color, it also has a nice, subtle chocolate flavor from the cocoa powder. Buttermilk is another really classic red velvet cake ingredient and helps to make the cake ultra-moist, rich, and really distinct in flavor.
How healthy is the best red velvet cake?
This cake recipe really isn’t meant to be “healthy” — it’s more of an indulgent dessert recipe than anything. If you tolerate the included ingredients well, we say go for it!
How long does it take to make this homemade red velvet cake recipe?
The active time required here is pretty minimal. You’ll need about 15 minutes to make the cake batter and another 15 for the frosting. Once your cakes are completely cooled, you’ll also need to spend a bit of time frosting and layering them!
Red Velvet Cake Ingredients
Here’s what you’ll need to make this really delicious cake + the fluffy cream cheese frosting that it pairs beautifully with:
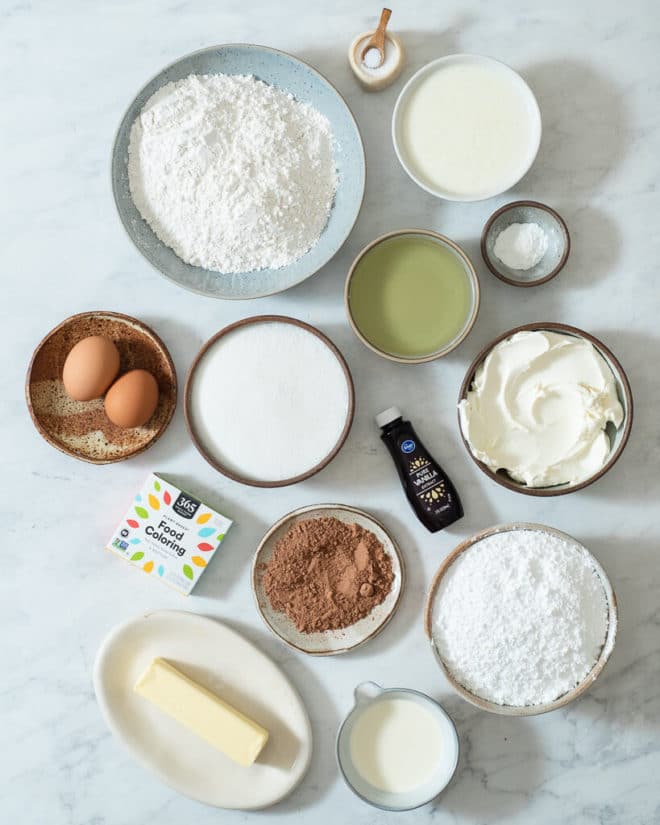
For the Cake
- Oil – to start, you’ll need 1 ⅓ cups (276 grams) of a mild-flavored oil. This can be avocado oil, melted coconut oil, or any other mild oil that you typically bake with.
- Sugar – 2 cups (430 grams) of organic cane sugar get tossed into the mix to sweeten the cake.
- Eggs – in addition to the oil, you’ll also need 2 large eggs.
- Vanilla Extract – 2 teaspoons of vanilla extract adds a really nice subtle flavor.
- Flour – the base of this cake is made up of 2 ½ cups (360 grams) of all-purpose flour (if you’re gluten-free, feel free to use King Arthur’s Measure for Measure flour).
- Buttermilk – 1 ¼ cups (280 grams) of buttermilk helps to add a really nice richness to the finished product.
- Cocoa Powder – for the classic chocolate flavor, 2 tablespoons of unsweetened cocoa powder get mixed in as well.
- Salt – 1 teaspoon of salt helps to enhance all of the other flavors!
- Baking Powder – you’ll also need to grab 1 teaspoon of double-acting baking powder so that the cake will rise properly.
- Food Coloring – 1 ounce of red food coloring will give the cake its classic red color!
For the Fluffy Cream Cheese Frosting
- Cream Cheese – 1 ½ blocks (12 ounces) of cream cheese acts as the base of our cream cheese frosting, of course!
- Butter – 1 stick (8 tablespoons) of salted room temperature butter goes into the bowl with the cream cheese.
- Vanilla Extract – for a really delicious vanilla flavor, 2 teaspoons of vanilla extract also gets added in!
- Powdered Sugar – 4 cups of powdered sugar sweetens the frosting.
- Heavy Cream – this one is optional, but 1-3 tablespoons of heavy cream or full-fat coconut milk will help to lighten up the frosting (and make it nice and fluffy!).
Ingredient Modifications
While this cake is really spectacular as written, feel free to make slight modifications and adjustments if needed. Because baking is a chemistry, you’ll want to be careful to stick to the approved modifications below:
- Make it gluten-free: for a GF cake, simply replace the all-purpose flour with gluten-free all-purpose flour — King Arthur’s is our favorite!
- Make it dairy-free: for a dairy-free cake, use 1 1/4 cup of full-fat canned coconut milk + 1 tablespoon of either lemon juice or apple cider vinegar in place of the buttermilk. As for the frosting, use dairy-free cream cheese (Kite Hill is a great brand for this!), vegan butter, and full-fat coconut milk (in place of the heavy cream).
Can you make red velvet cake without red food coloring?
While there are some natural alternatives to food coloring that you can use to color your cake (think: beet juice, beet powder, etc.), Brittany formulated the taste and texture of this recipe with food coloring as an ingredient. Feel free to use conventional food coloring if that’s what you have, or even better, use a more natural food coloring option!
Supplies Needed to Make this Recipe
- 2 (8-inch) Cake Pans
- Stand Mixer or Hand Mixer
- Large Bowl (if using a hand mixer)
- Silicone Spatula
How to make Red Velvet Cake from Scratch
The process is really simple, so even though the finished product may *look* fancy, don’t be intimidated! Here’s how you’ll bring it together in your own kitchen:
- Prep – first, get everything ready! Preheat your oven to 350°F and spray two 8-inch nonstick cake pans with oil.
- Beat the oil, eggs, sugar, and vanilla – to the bowl of a stand mixer (or a large bowl, if using a hand mixer), add the oil, eggs, sugar, and vanilla, and beat on high for 1 minute.
- Add the rest of the cake ingredients – to the same bowl, add in the buttermilk, cocoa powder, salt, baking powder, flour, and red food coloring, and beat on low for 15 seconds. Then, gradually increase the speed until you are beating on high and the batter is completely smooth.
- Pour the batter into the cake pans – divide the batter evenly and pour into the two prepared cake pans.
- Bake – place both filled cake pans on the middle rack of the oven and bake for 28-32 minutes, until a toothpick inserted into the cakes comes out clean.


- Let cool – remove the cakes from the oven and allow them to cool completely before removing them from the pans.
- Make the frosting – while the cakes are cooling, make the frosting! In a large bowl (if using a hand mixer) or in the bowl of a stand mixer, add the cream cheese, butter, and vanilla, and beat on high until smooth. Then, add in the powdered sugar 2 cups at a time, beating with each addition. If desired, add 1-3 tablespoons of heavy cream or full-fat coconut milk to lighten up the frosting and make it fluffy.
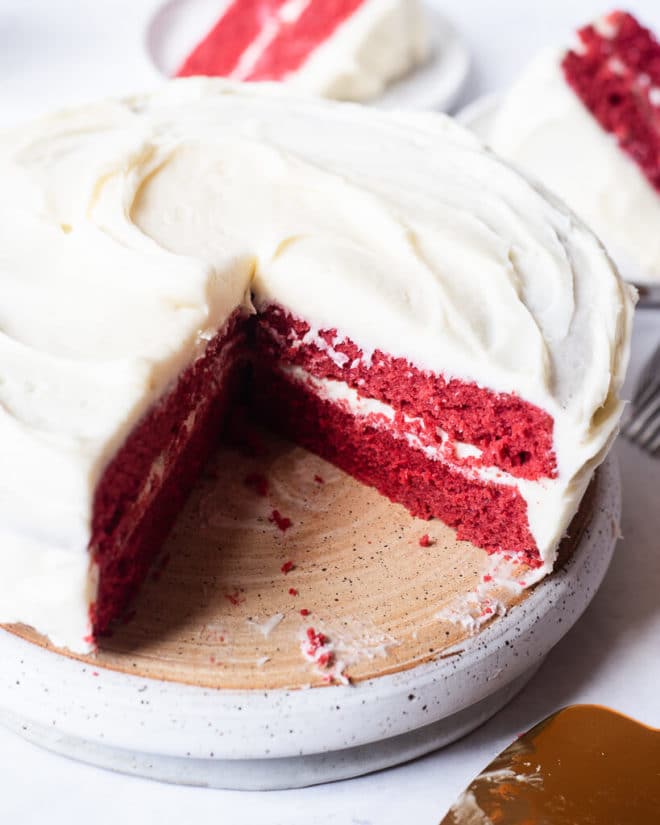
- Assemble the layer cake – once the cakes have cooled completely, remove them from the pan and trim them to be level (removing any rounded tops that developed in the oven). Place a thin layer of frosting (a crumb coat) on the bottom layer of the cake and place it in the fridge for 15-30 minutes. Once chilled and the frosting has firmed up a bit, add a thicker layer of frosting and then place the second layer of cake on top. Place a thin crumb coat layer of frosting on the top layer and sides, and chill in the fridge for another 15-30 minutes. Once chilled, spread the remaining frosting evenly on the tops and sides.
- Store – if saving for later, either store covered in the fridge for 3-4 days or at room temperature if your kitchen is not too warm.


Tips and Tricks
We asked Brittany to send all of her best red velvet tips and tricks…here they are!
- Instead of using traditional 8-inch cake pans, try using two springform pans instead. This will guarantee that your cake will never stick to the pan.
- To make this cake dairy-free, use 1 ¼ cups (280 grams) of full-fat coconut milk + 1 tablespoon of lemon juice or apple cider vinegar. For an extra moist cake use the blue Good & Gather unsweetened coconut milk.
- If you would like to add a fun little flair to your cake, use ½ of a cup of cold, strong coffee. If you do this, you will only need ¾ cup of buttermilk (or its dairy-free sub).
- If you want a bright red color, use traditional unsweetened cocoa powder. If you want a darker, deeper red, opt for dark unsweetened cocoa powder (such as Hershey’s Special Dark).
- Use the gram measurements (vs. cup measurements) for guaranteed results.
Why does my red velvet cake taste weird?
Ooh, good question! The biggest culprit I can think of for an off-tasting red velvet cake is the food coloring. Make sure you’re using food coloring that is free from odd aftertastes — if you’re purchasing on Amazon, it’s really helpful to look at reviews for this reason!
What is the flavor of red velvet cake?
Red velvet cake has a subtle chocolate flavor (from the cocoa powder). The buttermilk and cream cheese frosting also lend a really distinct flavor to red velvet cake.
What goes with red velvet cake?
In my opinion, a big ole glass of milk! Red velvet cake isn’t traditionally served with any one certain thing, but feel free to pair it with ice cream or another sweet accompaniment, if you’d like.
What is the best frosting to use with a red velvet cake recipe?
Cream cheese frosting is the most classic red velvet cake dressing, but if you aren’t a fan, know that you could totally use a buttercream frosting if you’d like.
How do you store this easy red velvet cake recipe?
Store your leftover red velvet cake either covered in the fridge (for up to 4 days) or at room temperature if your kitchen isn’t too warm!
Does red velvet cake freeze well?
I wouldn’t necessarily make a red velvet cake with the intent of freezing the whole thing before serving it (serving it fresh is definitely best), but freezing leftover red velvet cake is a really great option! To do this, I’d go ahead and slice the cake, then wrap each slice in parchment (or wax) paper, and toss all of the wrapped pieces in a large Ziplock bag to freeze. This will allow you to grab, thaw, and enjoy a slice at a time!
How long does this easy red velvet cake keep?
Any leftover cake you have should be enjoyed within about 4 days of baking. Enjoy!
Red Velvet Cake
Ingredients
For the Cake:
- 1 ⅓ cups 276 grams mild-flavored oil (avocado oil, melted coconut oil, or any other mild oil that you typically bake with)
- 2 cups 430 grams organic cane sugar
- 2 large eggs
- 2 teaspoons vanilla extract
- 2 ½ cups 360 grams all-purpose flour
- 1 ¼ cups 280 grams buttermilk
- 2 tablespoons unsweetened cocoa powder
- 1 teaspoon salt
- 1 teaspoon double-acting baking powder
- 1 ounce red food coloring
For the Fluffy Cream Cheese Frosting:
- 1 ½ blocks 12 ounces cream cheese
- 1 stick 8 tablespoons salted butter, room temperature
- 2 teaspoons vanilla extract
- 4 cups powdered sugar
- 1-3 tablespoons heavy cream or full-fat coconut milk optional
Instructions
- Preheat your oven to 350°F and spray two 8-inch nonstick cake pans with oil.
- To the bowl of a stand mixer (or a large bowl, if using a hand mixer), add the oil, eggs, sugar, and vanilla, and beat on high for 1 minute.
- To the same bowl, add in the buttermilk, cocoa powder, salt, baking powder, flour, and red food coloring, and beat on low for 15 seconds. Then, gradually increase the speed until you are beating on high and the batter is completely smooth.
- Divide the batter evenly and pour into the two prepared cake pans.
- Place both filled cake pans on the middle rack of the oven and bake for 28-32 minutes, until a toothpick inserted into the cakes comes out clean.
- Remove the cakes from the oven and allow them to cool completely before removing them from the pans.
- While the cakes are cooling, make the frosting: in a large bowl (if using a hand mixer) or in the bowl of a stand mixer, add the cream cheese, butter, and vanilla, and beat on high until smooth. Then, add in the powdered sugar 2 cups at a time, beating with each addition. If desired, add 1-3 tablespoons of heavy cream or full-fat coconut milk to lighten up the frosting and make it fluffy.
- Once the cakes have cooled completely, remove them from the pan and trim them to be level (removing any rounded tops that developed in the oven). Place a thin layer of frosting (a crumb coat) on the bottom layer of the cake and place it in the fridge for 15-30 minutes. Once chilled and the frosting has firmed up a bit, add a thicker layer of frosting and then place the second layer of cake on top. Place a thin crumb coat layer of frosting on the top layer and sides, and chill in the fridge for another 15-30 minutes. Once chilled, spread the remaining frosting evenly on the tops and sides.
- If saving for later, either store covered in the fridge for 3-4 days or at room temperature if your kitchen is not too warm.
Recipe Notes
- Instead of using traditional 8-inch cake pans, try using two springform pans instead. This will guarantee that your cake will never stick to the pan.
- To make this cake dairy-free, use 1 ¼ cups (280 grams) of full-fat coconut milk + 1 tablespoon of lemon juice or apple cider vinegar. For an extra moist cake use the blue Good & Gather unsweetened coconut milk.
- If you would like to add a fun little flair to your cake, use ½ of a cup of cold, strong coffee. If you do this, you will only need ¾ cup of buttermilk (or its dairy-free sub).
- If you want a bright red color, use traditional unsweetened cocoa powder. If you want a darker, deeper red, opt for dark unsweetened cocoa powder (such as Hershey’s Special Dark).
- Use the gram measurements (vs. cup measurements) for guaranteed results.


Can I make this without red food coloring? is there a better option?
Made this cake and it was THE BEST cake I think I’ve ever had. I want to make it for a baby shower for a little boy. Could I make it blue? Would I use the same amount of food color?
What a compliment! Our recipe developer, Brittany Angell, is so talented! I think you could make it blue (but full transparency, I have never tried). I would try a mix of blue and violet food coloring (to counter the cocoa powder) in the same amount. How fun! -Melissa
I’m not seeing the Pin It button anywhere on your recent recipes
Hi Vicki! There should be a vertical social media bar on the left-hand side of your screen with a Facebook, Twitter, Pinterest, and email button. Let me know if you have additional questions! ~Melissa
I’m curious to see if anyone has made this gluten and dairy free using the KA gf flour and coconut milk – if so how did it turn out? I have been having bad luck lately with trying to swap 1 for 1 gf flour with regular flour and I’m using the King Arthur brand. The texture has been gummy and it smells like playdoh lol.
This can absolutely be made gluten and dairy-free with those swaps, T! Brittany tested the swaps. The flour swap is just 1:1, but here’s her tip for the coconut milk swap: To make this cake dairy-free, use 1 ¼ cups (280 grams) of full-fat coconut milk + 1 tablespoon of lemon juice or apple cider vinegar. For an extra moist cake use the blue Good & Gather unsweetened coconut milk. I hope that helps!