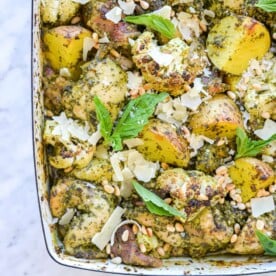
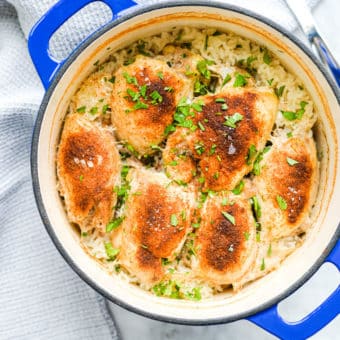
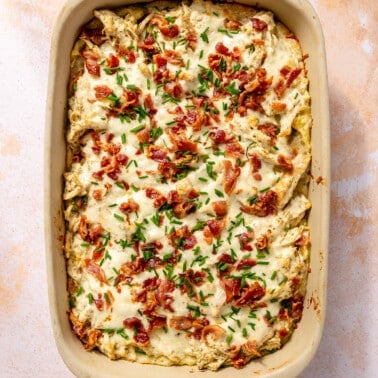
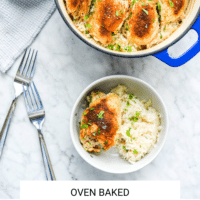
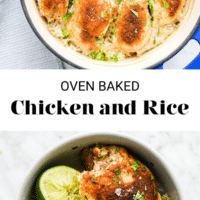
This delicious baked chicken and rice recipe is a one-pot meal that is perfect for a quick and easy weeknight dinner. The chicken is juicy and flavorful, and the rice is perfectly cooked.
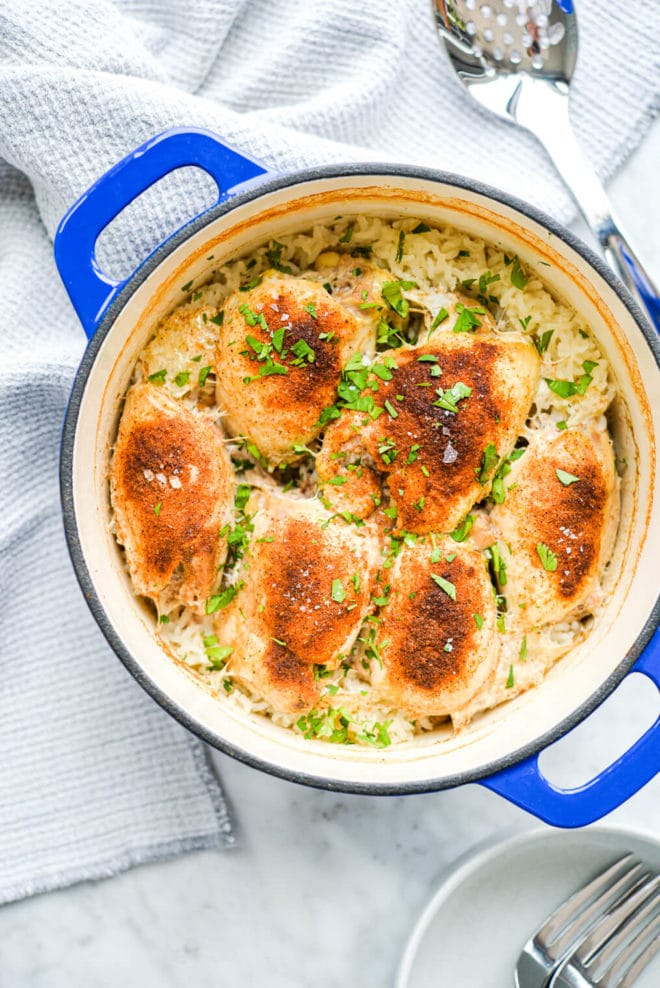
Table of Contents
This recipe is…
Y’all, we did it. WE DID IT! I feel like Elle Woods (Reese Witherspoon) giving the Law School Commencement Address at the end of Legally Blonde. After so much trial, so much error, but an abundance of hope, I finally cracked the code on this epic one-pot dinner. After 7 tries and leaning heavily on the scientific method, we PERFECTED this One-Pot Baked Chicken and Rice.
What was so challenging? You’d think that such a simple recipe would be simple to develop …but that’s not the case with baked rice. The trick is getting the rice *and* the chicken to have a delicious texture at the end. After so many variations, I finally landed on the perfect approach.
This baked chicken and rice recipe is a simple and flavorful dish that is sure to become a family favorite. In this recipe, we’ll show you how to make juicy and tender chicken thighs and perfectly cooked rice in just one pot. Let’s get started!
Why You’ll Love This Recipe
The beauty of this dish, now that we’ve laid the how-to groundwork, is that you can make it your own. Rotate seasoning the chicken with your favorite spice blends, garnish with whatever herbs you have on hand, and give new life to this glorious EASY one-pot dinner time and time again.
Developing this recipe for you (and for me, let’s be honest) makes me giddy. There’s just something about being able to throw everything into the same dish and know that by dinnertime, you’ll have a really well-balanced, easy-to-clean-up meal for your family. Here are a few reasons that this recipe is the *best* weeknight dinner:
- Super easy – I mean, it doesn’t get much easier than throwing everything (raw!) into one dish and popping it into the oven, does it?
- Low prep – the rice and chicken both go into the dish raw, so the total amount of prep time here is no more than 5 minutes. That’s my kind of dinner, y’all!
- Customizable – play with the seasoning that you use and really make this your own. If you love spice, maybe consider a spicy seasoning blend. If you’re a fan of garlic, use a garlicky blend (we love this one).
- Well-balanced – this is one reason that we absolutely love one-pot meals. This recipe has everything you need for a really satisfying, well-rounded dinner. If you’d like to do a simple veggie side (think: steamed broccoli, green beans, or a simple salad), feel free to do that. It’ll be perfect all on its own, though!
Ingredient Notes
The ingredient list for this oven baked chicken and rice is really simple, y’all. Here’s what you’ll need:
- 1 cup of white rice
- 1 ½ cups of chicken or veggie broth
- ½ teaspoon of sea salt
- 6 boneless, skinless chicken thighs (about 2 pounds worth of thighs)
- 1 tablespoon of a seasoning blend of your choice
- 1 lemon or lime (for garnish – you choose!)
- Fresh herbs (for garnish)
How To Make Baked Chicken and Rice in the Oven
With such little prep time and the oven doing all of the real work, anyone can make this recipe! Here’s exactly what you’ll need to do:


- Rinse the rice – before adding the rice to the dish, go ahead and put it into a fine-mesh strainer to rinse it thoroughly. Though this step is optional, we think it’s a really good idea!
- Add the rice + broth – add the rice, broth (or water), and the sea salt to a 3-quart Dutch oven (or another similarly sized baking dish) and stir to combine.
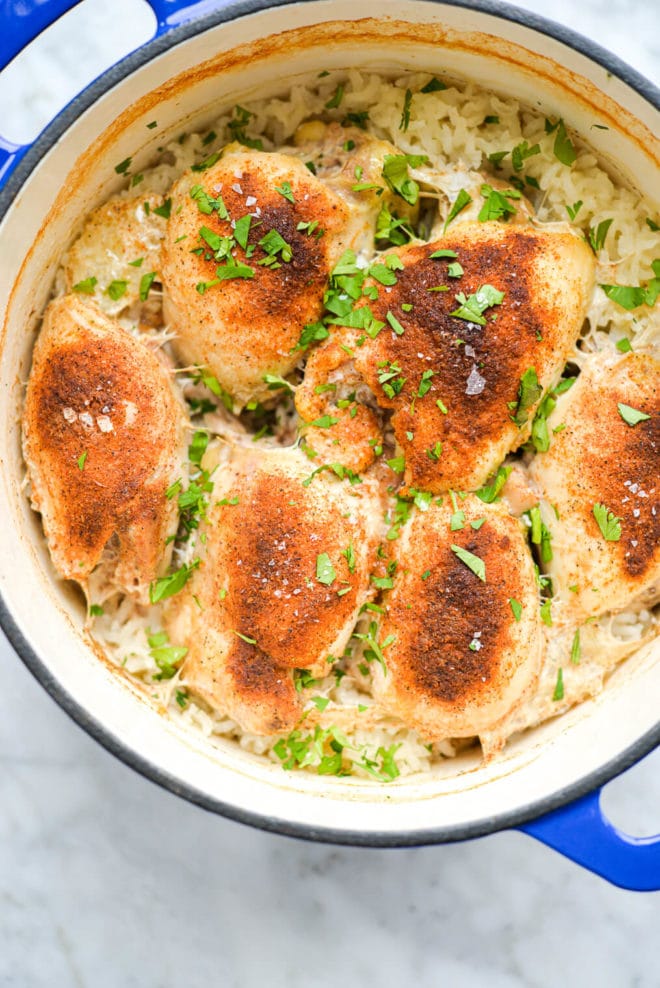
- Add the chicken – lay the chicken thighs on top of the rice. Be sure to create an even layer over the rice with the chicken, and try not to push the chicken down into the rice.
- Season – sprinkle your seasoning blend of choice over top of the chicken.
- Cover + bake – cover the dish with a lid or aluminum foil if needed, then bake at 350°F for 45 minutes.
- Uncover + finish baking – once the 45 minutes is up, uncover the dish, and bake for 10 more minutes.
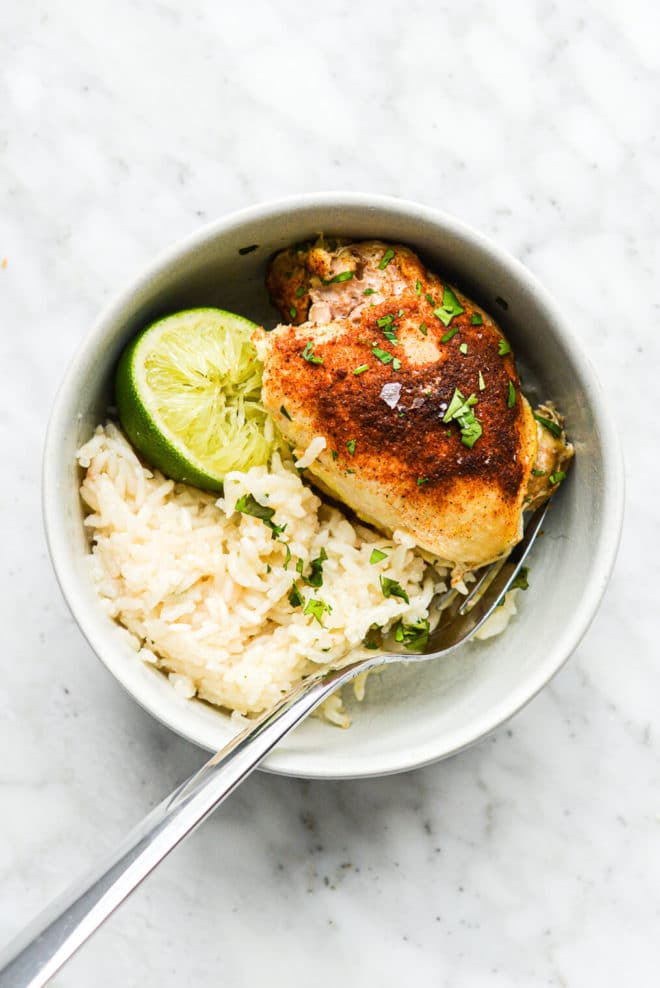
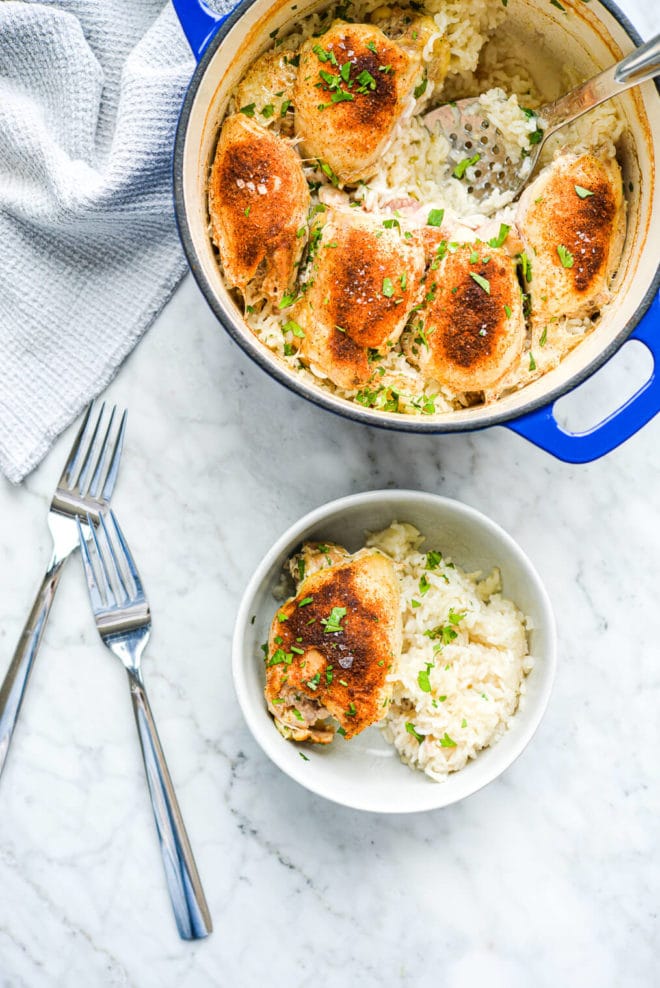
- Garnish, serve, and enjoy!
Tips and Tricks
Create a layer with the chicken – you’ll need to make sure that the chicken sits on top of the rice, creating a full layer, so that no rice is exposed in the oven. If the rice is exposed, it’ll dry out during the cooking process.
Rinse the rice – while this isn’t necessary, we do recommend rinsing the rice before adding it to the dish! During testing, we found that when we didn’t rinse our rice, it ended up a little bit mushy.
Use a heavy lid instead of aluminum foil – if you have an enameled cast iron dish with a heavy fitted lid, you can make this in that and skip the foil.
Change up the spices – you can use any spice mix that you want, so feel free to play around with this!
Use a different protein – you can swap in chicken tenders, chicken breasts, or a flaky white fish (like cod, tilapia, or snapper) for the thighs. Just make sure that whatever protein you’re using forms one even layer on top of the rice. It’s also worth noting that because the proteins listed above have a lower fat content than chicken thighs, there is a chance that they’ll end up slightly overcooked.
Add more time if needed – if there is still moisture in the dish after the cooking time is up, leave it in the oven uncovered for an extra 10 minutes.
Frequently Asked Questions
Definitely use uncooked rice for this recipe. Cooked rice will really just turn into mush as the chicken bakes. Plus, the beauty of a recipe like this is that you don’t have to worry about an *extra* cooking step!
Unfortunately, brown rice won’t work here. This recipe was specifically tested for white rice, and because different types of rice have such different cooking times and rice-to-liquid ratios, we can’t guarantee that subbing a different rice here will work the same way that the white rice does.
This step is optional! The reason I recommend rinsing the rice is because rinsing helps to remove powdered starch that hangs out on dry rice. If you *don’t* rinse it off, you may end up with a slightly mushier rice texture (no big deal to most, including my family). Rinsing rice will get you closer to a fluffy, not sticky, rice texture in the end.
The method outlined here will get you as CLOSE to evenly-cooked rice with a method that’s as hands-off as possible. Because of a couple variables, there is a possibility of your rice cooking slightly unevenly. I’m going to walk you through WHY this could happen and some ideas for how to prevent it.
If the rice is undercooked in any portion of the dish, it will be the portion of rice directly under the chicken thighs. My best guess why: if the extra fat on the chicken thighs isn’t removed (usually done by your butcher), it will render off while it cooks. This rendered (liquid fat) pools directly underneath each piece of chicken, creating a barrier for that rice that prevents it from further absorbing the liquid (broth or water) meant to cook it complete.
How to prevent this? Make sure your chicken thighs are well-trimmed of visible fat (I’m just talking about those giant strips of solid white fat) AND, if you’re still concerned, the fix involves a simple stir 30-minutes into the cooking process. You’ll pull the pot out of the oven 30 minutes into it’s first 45 minute “covered” baking spell, pull the chicken OFF (I placed mine on a plate), give the rice below a really good stir, place the chicken *back* on top of the rice, pour in any juices from the plate that may have collected, cover, and finish baking covered for 15 more minutes. You’ll then finish the dish the same: bake uncovered for 10 minutes. No more unevenly cooked rice!
You don’t need to use broth! I’ve made this a handful of times at home when I didn’t have broth on hand (or the patience to defrost my frozen broth) and used water instead. The broth adds a really nice flavor to the dish, but using water will work just fine too. You just need 1½ cups of water (same amount as the broth) for the rice to cook properly.
Healthy means something different to everyone, but we think that if you tolerate rice and chicken well, this meal is definitely a healthy option.
I tested this recipe a few different ways. First, I baked it covered for the entirety of the baking time, but I actually found that the rice ended up getting a little bit too mushy for our liking. What I opted for in the end was a combo of covered and uncovered cooking time – this yielded the best texture in both the chicken and the rice.
Yes! You definitely do not need to cook the chicken before putting it into the casserole. That would not only add another step for you, but it would also really dry out the chicken.
This is one reason we really love using chicken thighs. Chicken thighs are fattier than chicken breasts (or tenders), so they don’t tend to dry out easily. Also, cooking this dish covered for the first 30 minutes really helps the chicken to stay nice and moist.
More Favorite Chicken Recipes

Juicy and Flavorful Baked Chicken and Rice
Ingredients
- 1 cup of white rice rinsed
- 1½ cups of chicken or vegetable broth or water
- ½ teaspoon of fine sea salt
- 6 boneless skinless chicken thighs (about 2 pounds total)
- 1 tablespoon of a seasoning blend of your choice
- Lemon or lime juice for garnish (optional)
- Fresh chopped herbs for garnish (optional)
Instructions
- Preheat the oven to 350 F.
- Add the rinsed rice, broth (or water), and the sea salt to a 3-quart Dutch oven or enameled cast iron with a matching lid and stir to combine.
- Lay the chicken thighs on top of the rice. Be sure to create an even layer over the rice with the chicken, and try not to push the chicken down into the rice.
- Sprinkle the dish with your seasoning blend of choice.
- Cover the pot with its lid, then bake for 45 minutes. After the 45 minutes is up, uncover the dish and bake for 10 more minutes, until the rice is fully cooked through and the chicken is slightly browned on top.
- Remove the dish from the oven, then garnish with lemon or lime juice and fresh herbs, if using, and enjoy!


If you do this recipe, it’s better to use bone in thighs with the skin on to add some good flavor to the rice but if you do it with boneless skinless thighs, you need to add two cans of cream of mushroom to really make the rice taste, excellent, other than that this is the way I always make it, either bone in skin on thighs, or with two cans of cream of mushroom to make it delicious or you could use cream of chicken, but cream of mushroom is preferred for greater flavor.
Great tips, Dan! Thank you so much for taking a moment to share!
I was impressed with this and other chicken recipes. I have been cooking chicken (all types) for over 20 years but still have not been able to attain juicy chicken. No matter how i cook – fry pan, oven, grill, etc. my chicken always comes out semi dry or totally dry regardless of how long the cooking time is. Unfortunately I have chronic kidney disease and as such have to diligently watch my intake of sodium, potassium, phosphorus and protein which is found in most foods. I try to not eat food items that are high in these nutrients – which is often hard to do. Thanks for your good work. Ed
Made this recipe with what I had on hand and it turned out great! I used brown rice instead of white (what we had) and just added more cook time while still covered. It turned out well cooked. I also added a bit of shredded cheese at the end just to give it a bit of creaminess and it was delicious! Highly recommend if you are not dairy free.
Wahoo! So glad you enjoyed it, Emory!
This looks great! Any tips on how to add a simple veggie either into this dish, or to go along with it?
Hi Katie! Steamed broccoli or green beans tossed in a little butter and sea salt would be a great addition. We haven’t tried adding it to the dish (my first try would be the broccoli), so let us know if you try baking it all together! -Team FF
This is such a great meal. One pot, easy and my family loves it. It’s on my weekly rotation.
We are so glad you enjoyed, Micah! Thank you for taking the time to share with us. -Team F&F
I made this with chicken breast tenderloins – reduced the time to 35 min covered 10 more uncovered and it came out great. The chicken is still moist and the rice is kind of soft, which I like. Definitely can do with chicken breasts and still have a delicious outcome!
Yum! Thank you for taking the time to share these modifications. So glad you enjoyed! -Team F&F
So yummy. I threw some frozen peas in for the last 10 minutes and they were the perfect addition.
Yum! Thank you for taking the time to share with us! Glad you enjoyed! ~Melissa
How can I make this if I don’t own a 3 quart Dutch Oven or enameled cast iron with matching lid.
Another similarly-sized dish will work, Jody! Just cover it tightly with aluminum foil!
If I am allergic to rice, can I substitute quinoa or other grains? If so, is the cooking time and amount of broth the same?
Thanks!
We haven’t tried it with any other grains, Terri! It’s worth a try, but also keep in mind that this recipe is pretty finicky and it took a lot of testing to get the ratio/time perfect. Let us know how it turns out if you try it, though!
Hello. The link to the spice blend is missing! I love this recipe though and I’ve made it several times.
Thanks for the heads up! It looks like that blend is not available on the Balanced Bites website, so that’s why the link isn’t working. I’m going to remove it!