These make ahead freezer breakfast burritos are the perfect option for rushed mornings when getting breakfast on the table is a challenge!
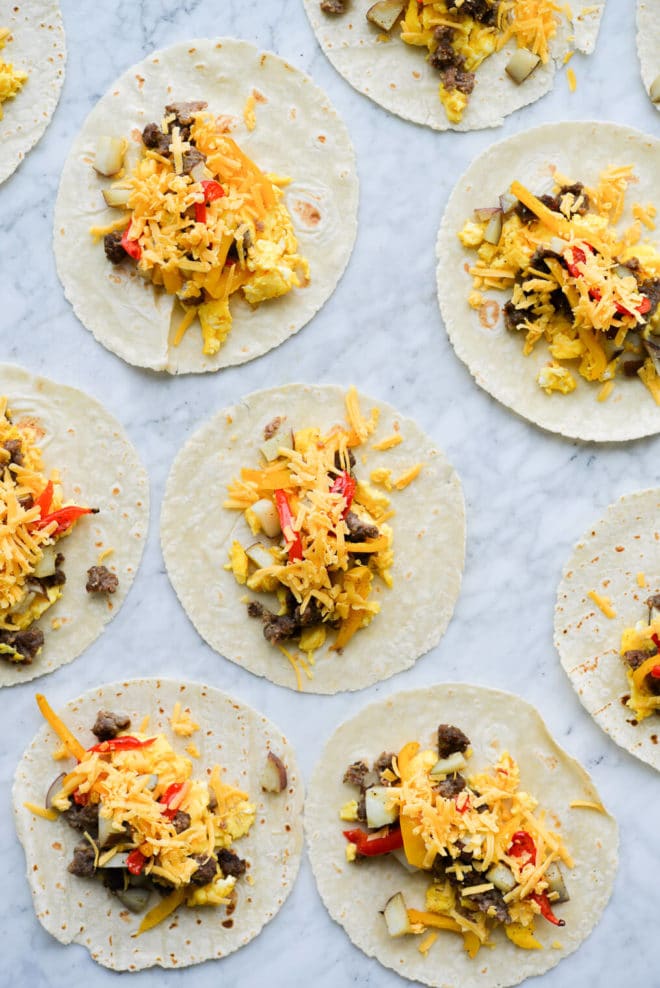
Table of Contents
- This recipe is…
- Difference Between a Taco and a Burrito
- Ingredients Needed
- Tortilla Sizes and Options
- How to Make Freezer Breakfast Burritos
- For the Bell Peppers + Potatoes
- For the Sausage
- For the Bacon
- For the Eggs
- How to Assemble Freezer Burritos
- Frequently Asked Questions
- More Favorite Breakfast Recipes
- Easy Freezer Breakfast Burritos Recipe
This recipe is…
I am so FREAKING excited about this recipe! While these burritos are absolutely ideal for every day busy mornings, they’re also really great for stocking the freezer up ahead of a busy season of life (think: a surgery, the arrival of a new baby, etc.) In fact, one of our biggest efforts in preparing for our daughter, Graysen’s, arrival was to stock up on homemade freezer meals.
After writing the Fed & Fit Book, I learned the important value of a freezer meal. While recipe testing for the book, I wound up freezing a LOT of the food …which came in so, so handy when my work transitioned to the hermit-like editing phase. Healthy freezer meals helped to keep me away from the (easy button) takeout menu because I had an even easier, even tastier option right in my own home. We applied the same principle when preparing for baby!
Today, we’re zeroing in on my favorite freezer meal of them all: the Homemade Freezer Breakfast Burrito. Meal-prepped breakfasts can be tough, especially when you want to freeze them in advance. This recipe went through several rounds of development before we finally cracked the code on the BEST way to make and then defrost the ideal frozen breakfast burrito, but by golly, we nailed it.
Difference Between a Taco and a Burrito
Believe it or not, this is a HIGHLY debated topic (even amongst those in the same household – looking at you, Cassy and Austin!) Here’s what we’ve decided:
- Burritos – typically, burritos are larger than tacos, and 1 burrito is *usually* enough to fill you up! Burritos also tend to be rolled (like we did here!) rather than folded over like a taco.
- Tacos – tacos are typically folded over (rather than rolled) and tend to be on the smaller size (1 serving = 2-3 tacos).
We consider this recipe a breakfast burrito because we rolled it up, but call it whatever makes the most sense to you – we don’t mind!
Ingredients Needed
Though you can add *so* many different things to your breakfast burritos (see our ideas below!), we settled on a few basic, really delicious ingredients. Here’s what you’ll need to make the burritos as pictured:
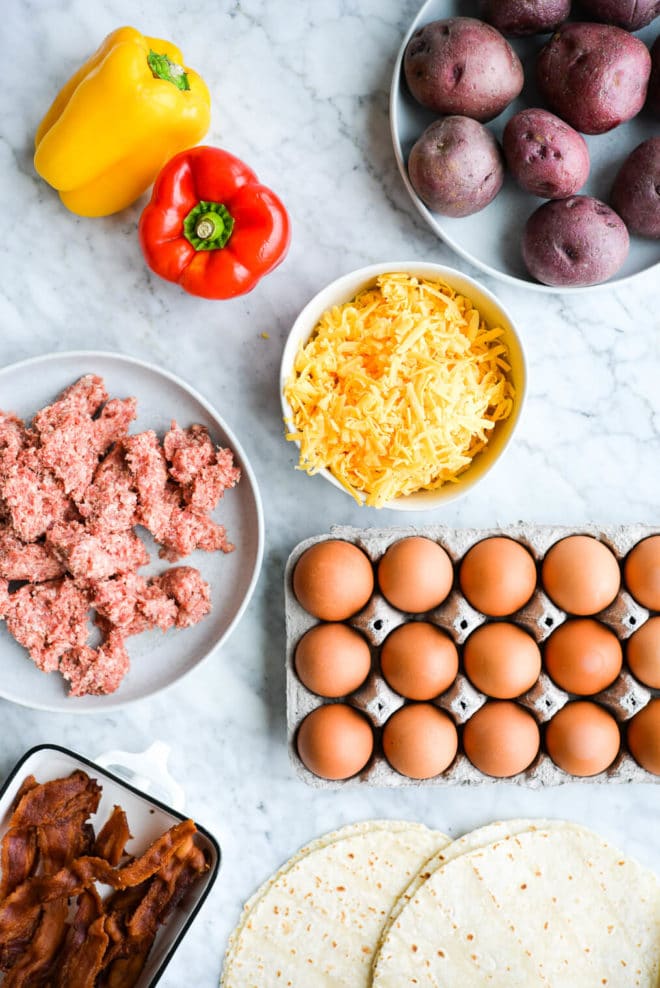
- Potatoes – for this recipe, you’ll need 1 pound of potatoes, chopped up into 1-inch cubes. We recommend red-skinned potatoes (no need to peel them!), but Yukon gold, sweet potatoes, or russet potatoes would all work well here.
- Breakfast Sausage or Bacon – you’re either a breakfast sausage person or a bacon person – whichever you choose, you’ll need a pound here!
- Bell Peppers – 2 thinly sliced red bell peppers will add a nice veggie-touch here!
- Olive Oil – you’ll use about a tablespoon of olive oil to coat the potatoes and bell peppers before putting them into the oven to roast.
- Salt + Pepper – a sprinkle each of salt and pepper will help to season the potatoes and red bell peppers.
- Butter – 1-2 tablespoons of butter will help the eggs to not stick to the pan.
- Eggs – an obvious ingredient on the list! You’ll need about 18 eggs here, but you could totally get away with a couple more or a couple less if you need to.
- Shredded Cheese – if you include cheese in your diet (we do!), feel free to add some to your breakfast burritos! You’ll need about a ½ cup (give or take a little bit).
- Tortillas – you’ll also want to grab a few packs of your favorite tortillas. If you’re using larger, burrito-size tortillas, you’ll need about 18, but if you’re using smaller tortillas (think: corn tortillas), you’ll want to grab closer to 36 tortillas.
What else can I add to breakfast burritos?
- Vegetables – leafy greens, mushrooms, zucchini or summer squash, really whatever your heart desires here!
- Beans – any variety will work.
- Alternative Proteins – turkey bacon, ham, or chorizo would all be great in place of the bacon or breakfast sausage.
- Sweet Potatoes – use these in place of white potatoes for a fun twist.
- After Reheating – avocado, cilantro, salsa, and pico de gallo would all make great fresh toppers for your burritos.
Tortilla Sizes and Options
There are *so* many tortillas out there, y’all! Below, you’ll find several options for your burritos – pick whichever you love + makes you feel best, and enjoy! Do note that the size of tortillas you choose will determine how many burritos you end up with.
- Taco-size tortillas – this is what we used! Regular, taco-sized tortillas are typically around 7.5 inches in diameter. If you choose this size, you’ll end up with about 18 breakfast burritos. Our favorite tortillas in this category are Mission GF tortillas (this is what we used), Siete chickpea or cassava flour tortillas (this is your best bet for grain-free tortillas), or (if you can tolerate them) regular ole flour tortillas.
- Smaller-sized corn tortillas – these tortillas are closer to 6 inches in diameter, and would make more of a street taco-sized breakfast burrito. Corn tortillas do tend to get crumbly when frozen + reheated, so if you go this route, know that this is likely to happen. If you choose to use smaller-sized tortillas, you’ll end up with about 36 finished breakfast burritos.
- Large, burrito-style tortillas – the last option here is a large, burrito-style tortilla. These are typically around 10 inches in diameter. If you go this route, we recommend Siete’s burrito tortillas or your other favorite large, burrito-style tortilla.
*Note: grain-free tortillas can be tricky to work with! Siete does an amazing job of helping troubleshoot crumbly/cracked tortillas, so be sure to read the package instructions for all of the best tips if you’re using their tortillas!
How to Make Freezer Breakfast Burritos
First, pick exactly what ingredients you’re going to use, and then read through the steps for each of those below! It’s important to read through it all first, because you may be able to combine some ingredients together (ex. potatoes, peppers, and sausage) depending on what you choose!
*If you plan on baking potatoes, bell peppers, sausage, or bacon (our preferred cooking method here), you’ll need to preheat your oven to 375°F.
For the Bell Peppers + Potatoes
- Toss your chopped potatoes and sliced bell peppers with olive oil, then spread them out on a rimmed sheet pan and sprinkle them with salt and pepper.
- Bake for 40 minutes.
For the Sausage
- If you choose to use sausage, simply use your fingers to pull apart the sausage and add clumps of it onto the sheet pan with the potatoes and sausage. Then, bake all 3 together for 40 minutes.
For the Bacon
- While the potatoes and peppers are baking, lay the strips of bacon out on a separate, large sheet pan, making sure that the bacon does not overlap.
- When the timer for the potatoes and peppers has 20 minutes left, put the bacon in the oven to continue baking with the potatoes and veggies for 20 more minutes.
For the Eggs
- Crack eggs into a large bowl and whisk with salt and pepper.
- In a large skillet, melt butter over medium-low heat. Once melted, pour in eggs and scramble until desired texture is achieved. I prefer to use a spatula to lightly stir my eggs until they just slightly firm up.


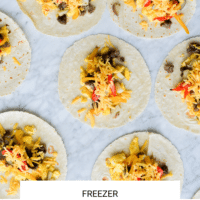
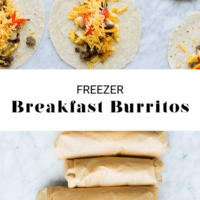
How to Assemble Freezer Burritos
- Let the filling ingredients cool for about 10 minutes before assembling your burritos.
- Place a tortilla on a piece of cut parchment paper. Add whatever combination of eggs, potatoes, bacon or sausage, peppers, potatoes, and cheese that you’d like in the middle of the tortilla, taking care not to over-fill them.
- Fold the two opposite sides of the tortilla over the filling, then fold the other side and roll as tightly as you can, making sure to use your fingers to keep in all of the filling while rolling.
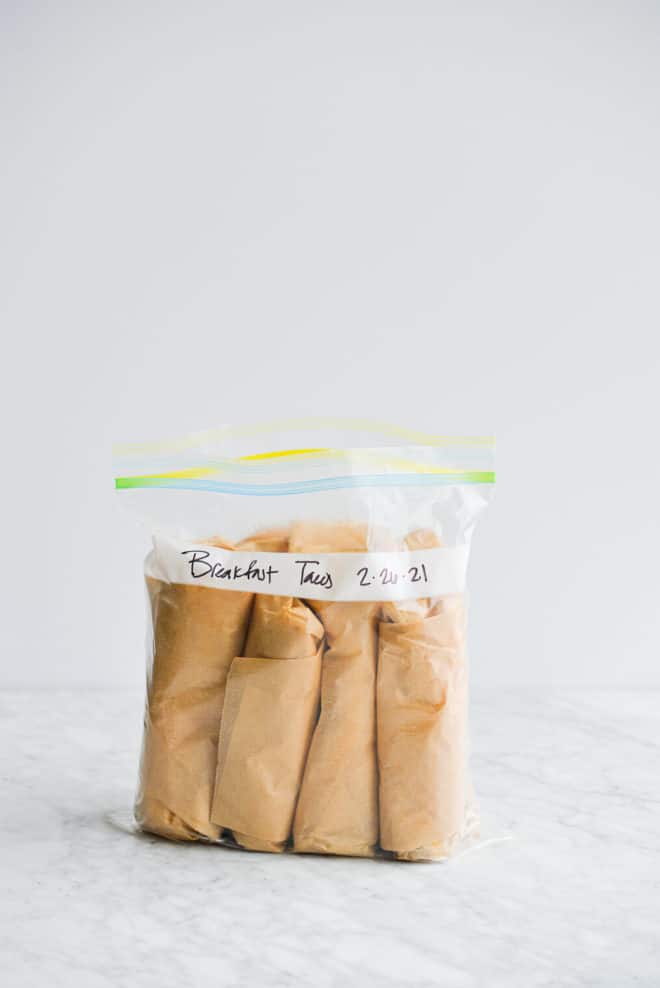
- Wrap in the paper, then put into a freezer-safe bag.
- Repeat until all burritos are assembled!
*Note: if you want to do this in a more eco-friendly way, feel free to reuse your parchment paper with each new batch of burritos (just lay it out on the counter to dry out after enjoying a burrito), OR to scrap the paper altogether, use cut pieces of clean kitchen cloth the same way.
Frequently Asked Questions
Once you’ve got a freezer-safe bag full of individually parchment paper-wrapped breakfast burritos, you’ll want to label the bag with the date and exactly what’s inside of it, and then pop the whole bag into the freezer!
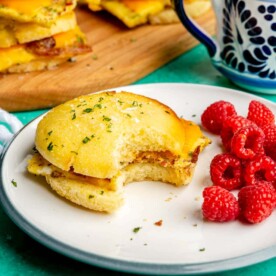
To reheat a burrito from frozen, simply microwave on high for 60-90 seconds. Alternatively, you can place the burrito on a sheet pan, and bake it at 350°F until warmed through (about 25 minutes). We recommend keeping the parchment paper on your burrito to reheat if you like a softer taco and unwrapping your taco completely before reheating for a slightly crispier taco.
This is a great question! Nobody likes a soggy breakfast burrito, that’s for sure. Here are a couple of ways that you can ensure a yummy (read: not soggy) end product:
Hold off on sealing + freezing – wait for ingredients to be room temperature before sealing and freezing your burritos. Hot ingredients will cause condensation and lead the tortilla to be soggy.
Bake instead of microwave – if you’ve done the above tip and you’re still experiencing soggy burritos, try baking the burritos to reheat instead of microwaving. To do this, unwrap the burrito and place it on a sheet pan, and bake it at 350°F until warmed through (about 25 minutes).
Toast it in a skillet – if you really want a crispy burrito, you can defrost the burrito in the fridge overnight or in the microwave, then toast for 2-3 minutes per side in a skillet over medium heat, until browned.
More Favorite Breakfast Recipes


Easy Freezer Breakfast Burritos

Ingredients
- 1 pound potatoes – any variety – we used red-skinned potatoes, chopped into 1-inch cubes
- 1 pound breakfast sausage or bacon
- 2 red bell peppers thinly sliced
- 1 tablespoon extra-virgin olive oil
- 1/2 teaspoon fine sea salt
- 1/4 teaspoon ground black pepper
- 2 tablespoons butter
- 18 eggs
- 1/2 cup shredded cheese
- 18 7.5-inch tortillas*
Instructions
- Preheat the oven to 375 F.
- Place the potatoes and bell peppers on a sheet pan, then toss them with the olive oil, salt, and pepper and spread them over the pan.
- If you’re using sausage: simply use your fingers to pull apart the sausage and add clumps of it onto the sheet pan with the potatoes and peppers. Bake all three together for 40 minutes.
- If you’re using bacon: bake the peppers and potatoes for 20 minutes. After 20 minutes, lay the bacon on a separate sheet pan and transfer it to the oven to bake alongside the peppers and potatoes for an additional 20 minutes.
- While the peppers and potatoes bake, crack the eggs into a large bowl and whisk with salt and pepper.
- Add the butter to a large skillet over medium-low heat. Once melted, pour in the eggs and scramble until the desired texture is achieved, then remove from heat.
- To assemble your burritos: let the filling ingredients cool for about 10 minutes, then heat a tortilla in a skillet over medium-high heat for about 15 seconds per side and place it on a piece of cut parchment paper.
- Add your fillings to the middle of the tortilla, then top with shredded cheese. Fold the two opposite sides of the tortilla over the filling, then fold the other side over the filling and roll as tightly as you can, making sure to use your fingers to keep in all of the fillings while rolling.
- Wrap the parchment paper around the burritos, then secure with tape or a rubber band and place in a freezer-safe bag. Repeat until all burritos are assembled!
- To reheat: remove the tape and microwave on high for 60-90 seconds, or bake it at 350 F for 10-15 minutes until warmed through.
Recipe Notes
- For gluten-free, we used these Mission tortilla wraps. Siete’s cassava or chickpea flour tortillas would make a great choice for grain-free!


I’ve made these several times for expecting families- they are delicious, individually wrapped, and simple to pull together. Perfect for life after a new baby! 10/10 would recommend.
So glad to hear that, Meghan! Such a great idea for expecting families!
Have you tried these with the Hatch Chili sausage HEB has now? Best breakfast tacos ever!!
I haven’t, but that sounds DELICIOUS!!!
Have you tried thawing overnight and baking to bring the morning prep time down? (No microwave over here, lol) Or does that cause texture issues?
I haven’t tried it, Sarah, but I definitely think it would work!
These are delicious. I actually forgot to add the cheese, but it’s definitely not lacking in flavor. I did what was recommended by waiting for the food to cool down before assembling and wrapping. I popped them in the microwave and they came out great. I will definitely use this again for my breakfast meal prep. Thank you so much for sharing.
Awesome! So glad to hear that, Jenny!! Thank you for sharing this with us!
Sounds really good. I will try them thank you very much.
Hope you love them, Pearletta!
There is a huge google ad right in the middle of your post. Makes it impossible to read your content. I get that ads cover your costs but placement and flashing irritability determine whether I ever come back to your site.
Thank you so much for letting us know. We don’t always know what ads are on the site, so this is super helpful for us. We’re looking into it now!